Custom Nodes Walkthrough
Custom Nodes allow you to extend the functionality of WEGnology’s workflow engine. This guide is a complete walkthrough for building a Custom Node that provides access to the OpenWeather API to retrieve current weather information.
To complete this walkthrough, you’ll need an OpenWeather API key. You can get one for free by signing up for an OpenWeather account.
Creating a New Custom Node
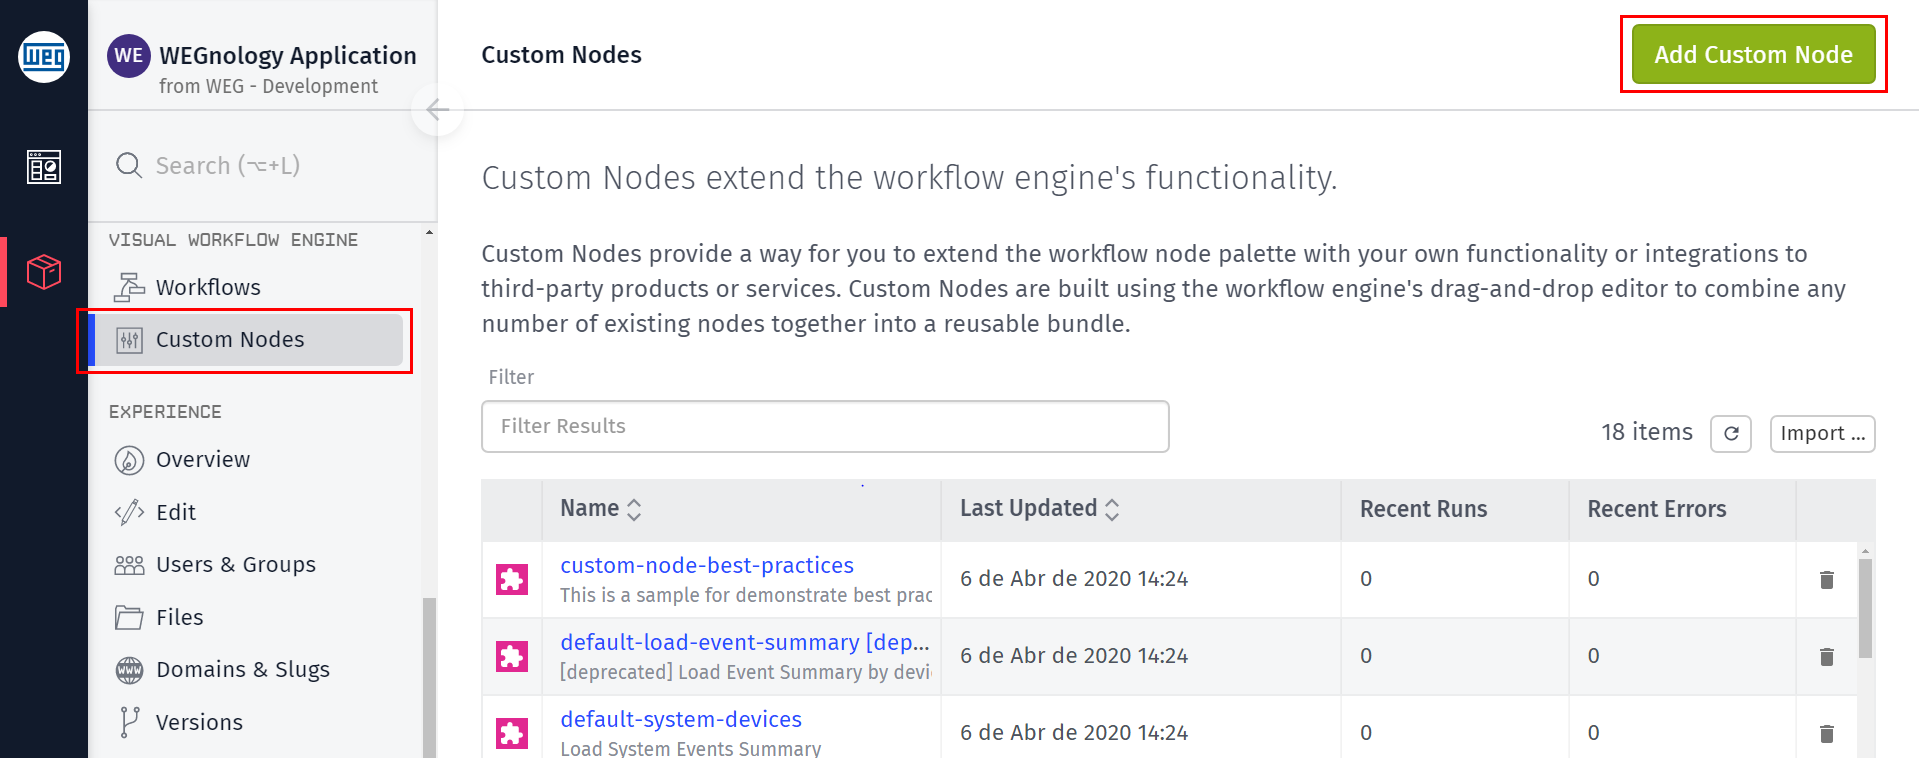
To create a new Custom Node, go to your application’s navigation menu and select Custom Nodes under the Visual Workflow Engine section. Then, click Add Custom Node in the top-right corner.
Note: The Custom Node in this guide can be built as either an Application Custom Node or as an Edge Custom Node. We recommend creating an Application Custom Node as doing so does not require setting up the Gateway Edge Agent or an Edge Compute Device for testing.
The next page is where we’ll configure the basic details of this node. This includes the name, description, custom icon, and the output details.
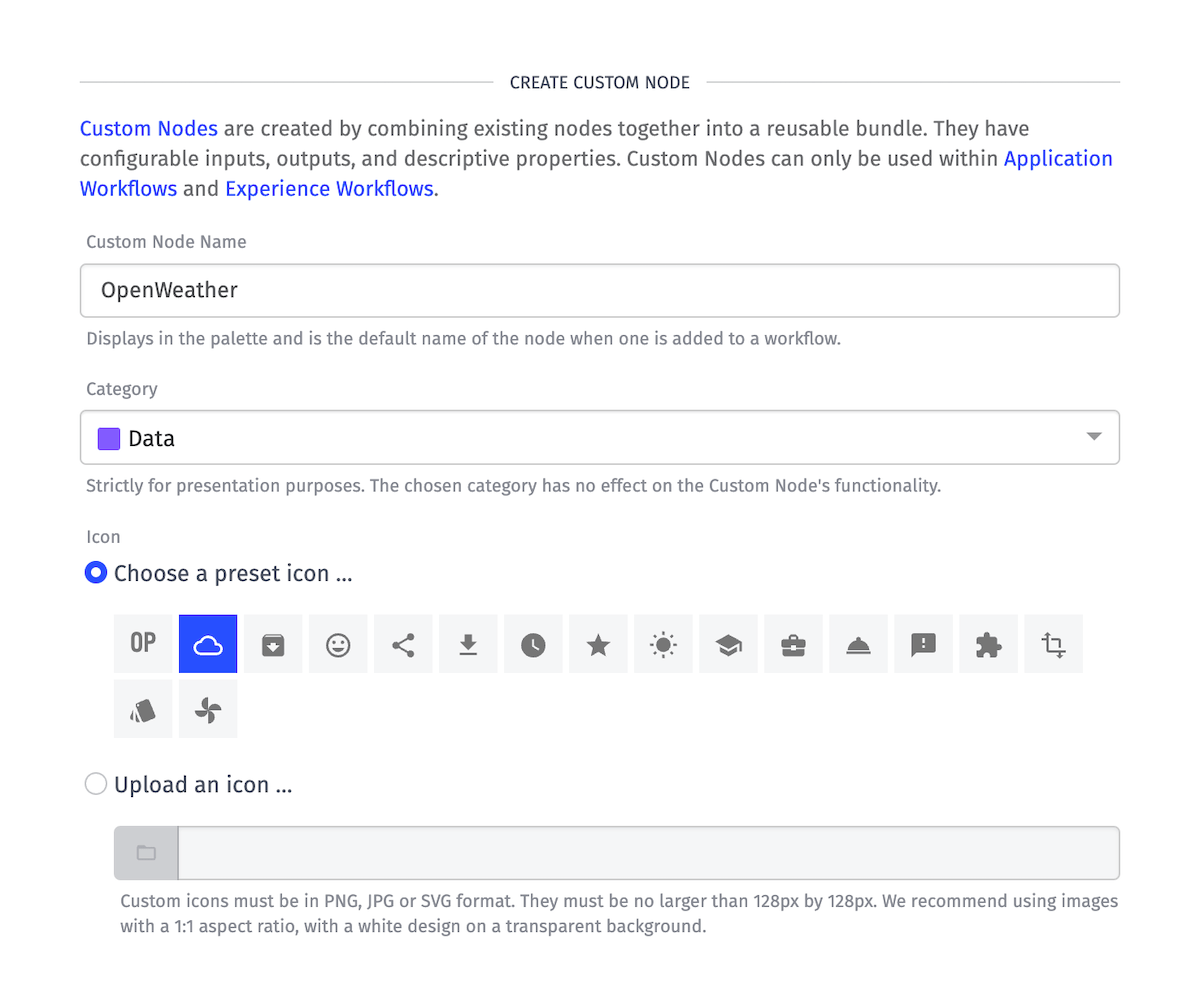
- Custom Node Name — Displays in the node palette and is the default name of the node when added to a workflow. Let’s name this node
OpenWeather. - Category — Determines the category under which this node will be located in the node palette, as well as the background color of the icon. Let’s choose
Data, since we’re fetching weather data. - Icon — The image shown next to your node name. You can choose one of our preset icons (as we’ve done here) or click on the folder button to choose a custom icon from your Application Files.
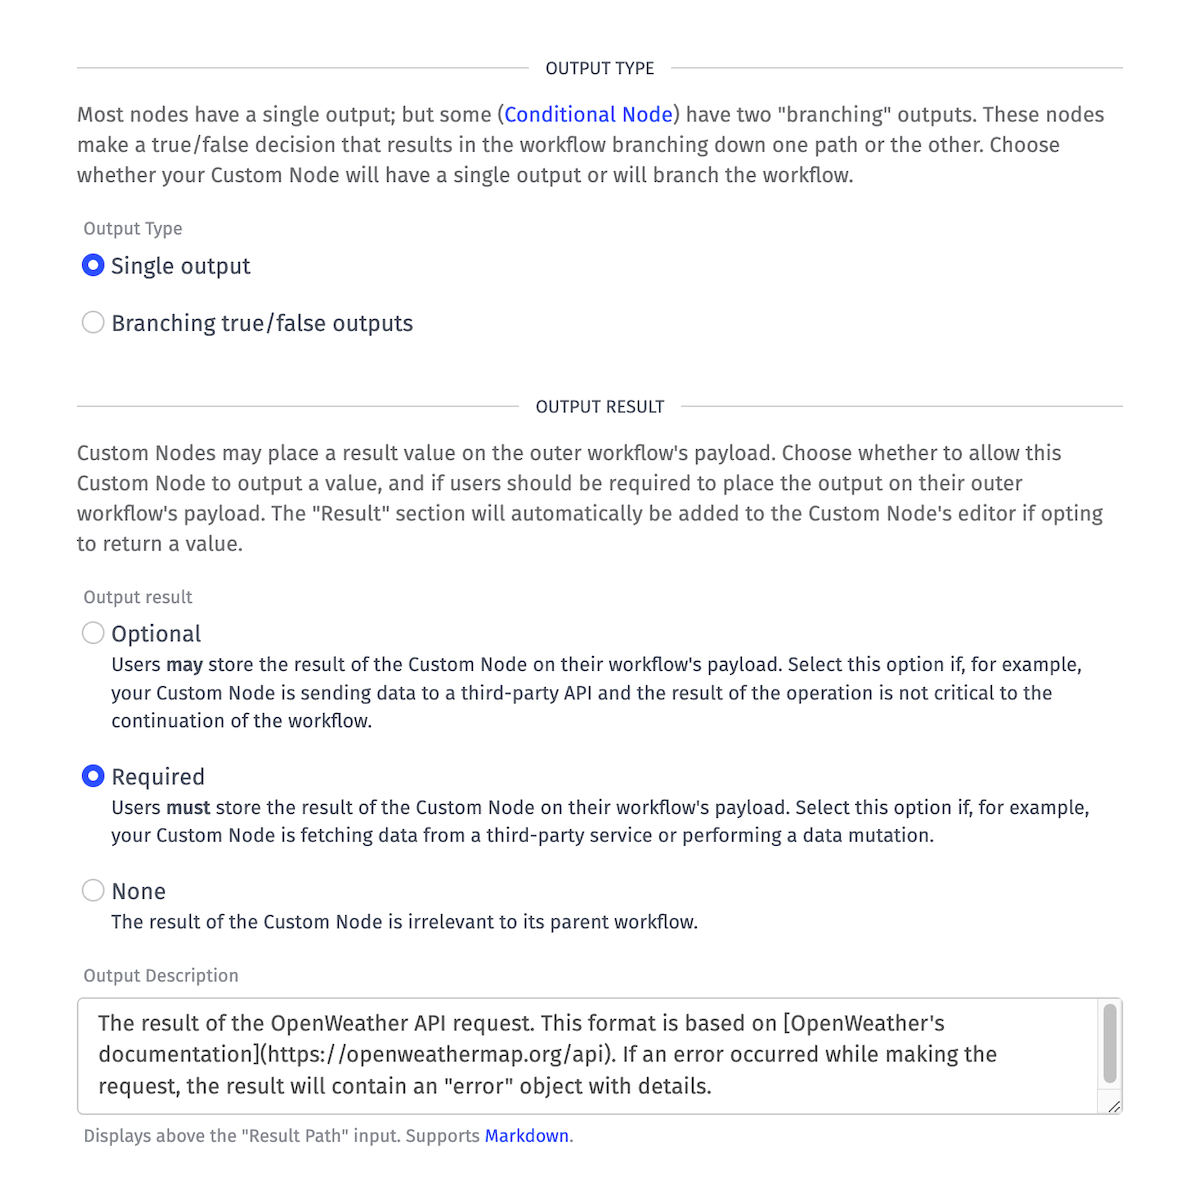
- Output Type — While some nodes have branching outputs (such as the Conditional Node), this node does not. Select
Single output. - Output Result — Since this node is fetching data from an API, select
Required. This will require a Result Path to be specified in the Result section when configuring this node in a workflow. - Output Description — When configuring this node in a workflow, this text will display in the Result section. Markdown is supported.
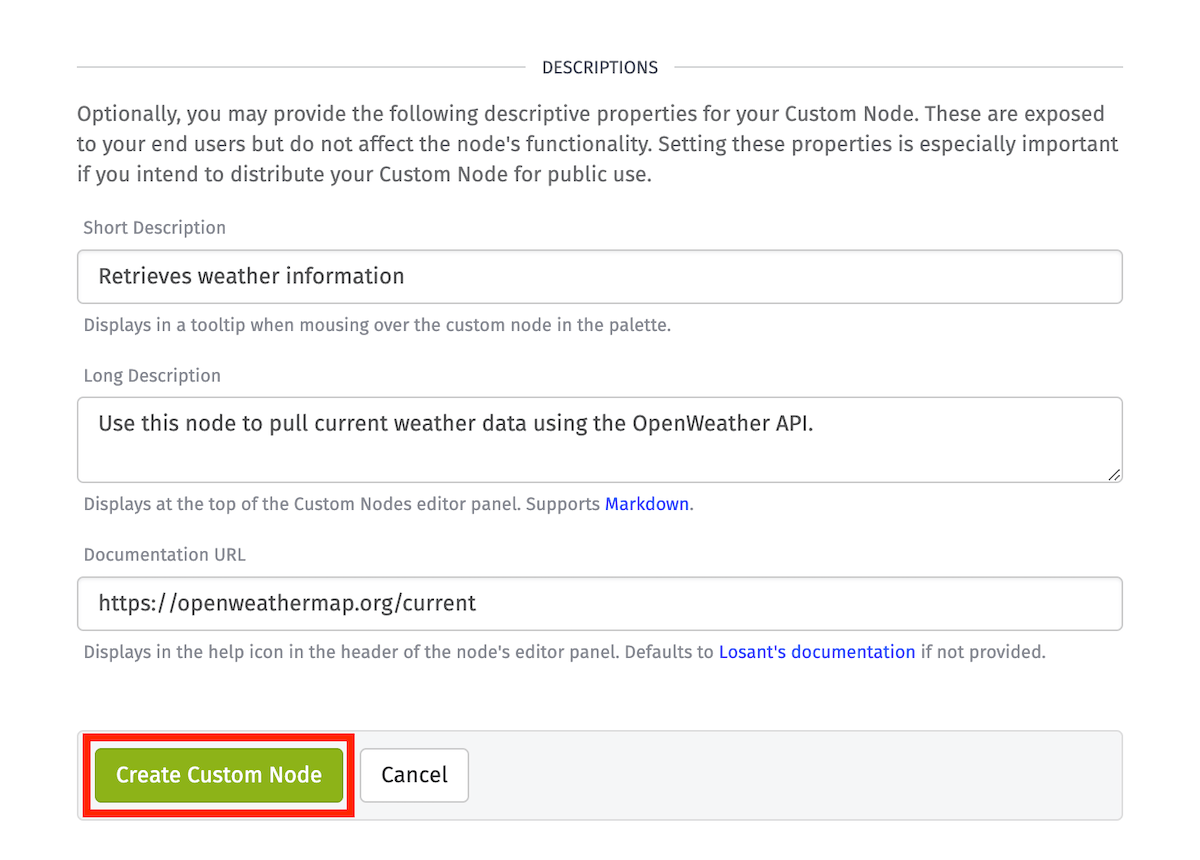
- Short Description — The text shown when hovering over the node in the node palette.
- Long Description — The text shown at the top of the node’s configuration panel.
- Documentation URL — The URL associated with the question mark icon in the node’s configuration panel.
Once you’ve entered all of the necessary configuration details, click Create Custom Node. This will take you a canvas where we’ll begin developing our new node.
Configuring Custom Node Inputs
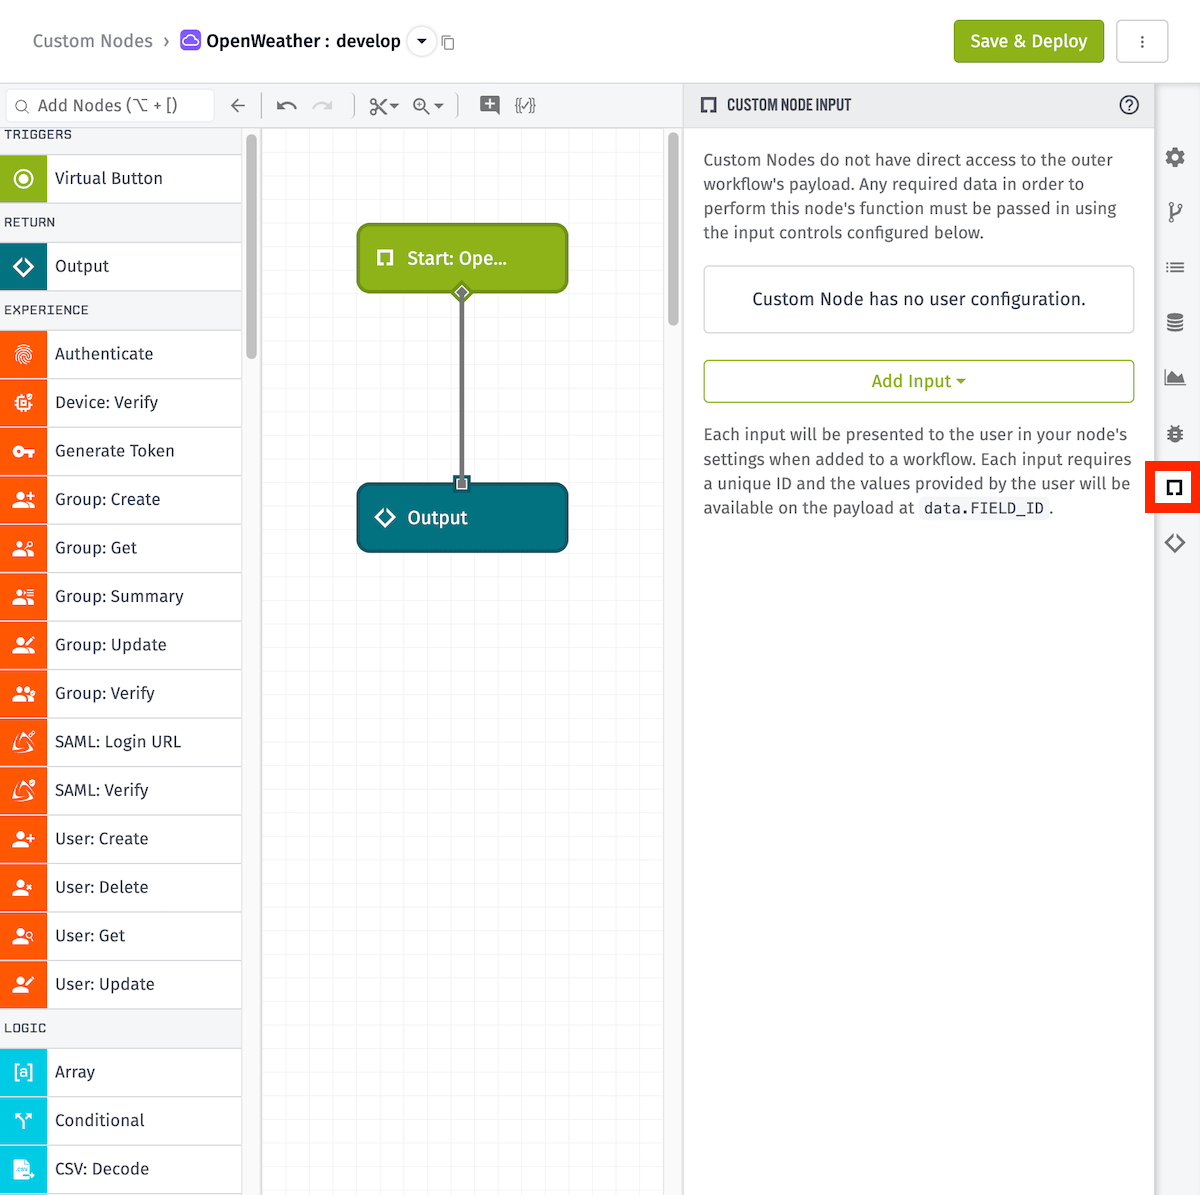
On this new canvas, you’ll see a Start: Custom Node Trigger and an Output Node. We’ll configure those later. For now, let’s take a look at the Custom Node Input tab, which is expanded on the right.
Custom Nodes do not have direct access to the outer workflow’s payload, so any data required by your node in order to perform its function must be passed in explicitly through defined inputs. The Custom Node Input tab allows us to configure the input fields that will be available to the user in the node’s configuration panel when used in a workflow.
In the case of our OpenWeather node, the inputs we want to request from the user are their OpenWeather API key and the GPS coordinates (latitude and longitude) for the location they want to monitor. This will require us to create three inputs.
OpenWeather API Key
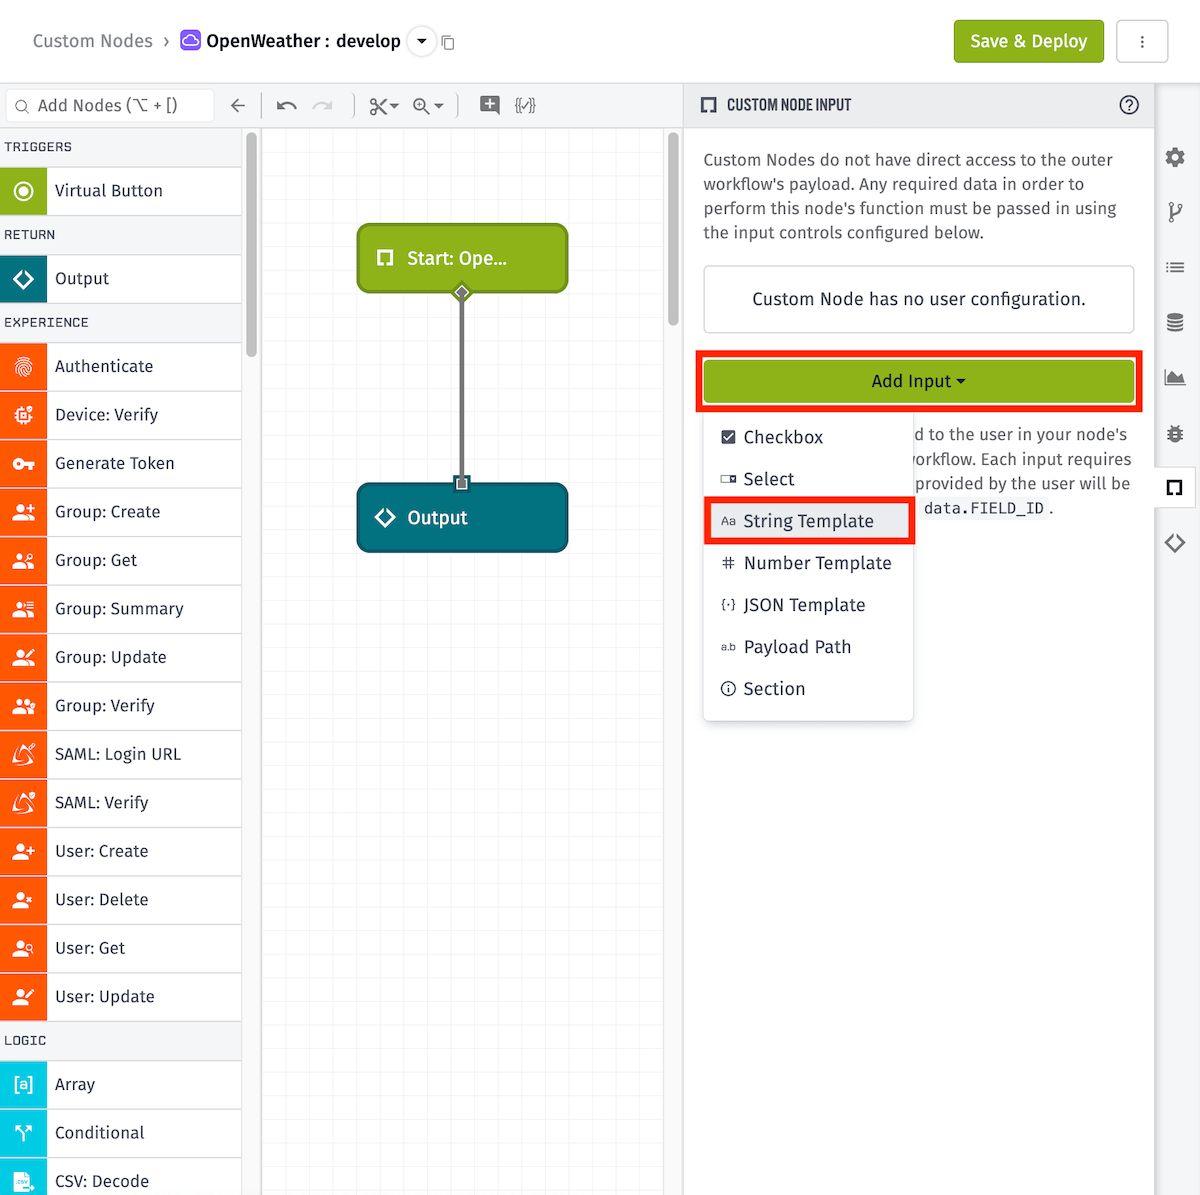
First, we’re going to add an input for the user’s OpenWeather API key. Click the Add Input button and select the String Template option.
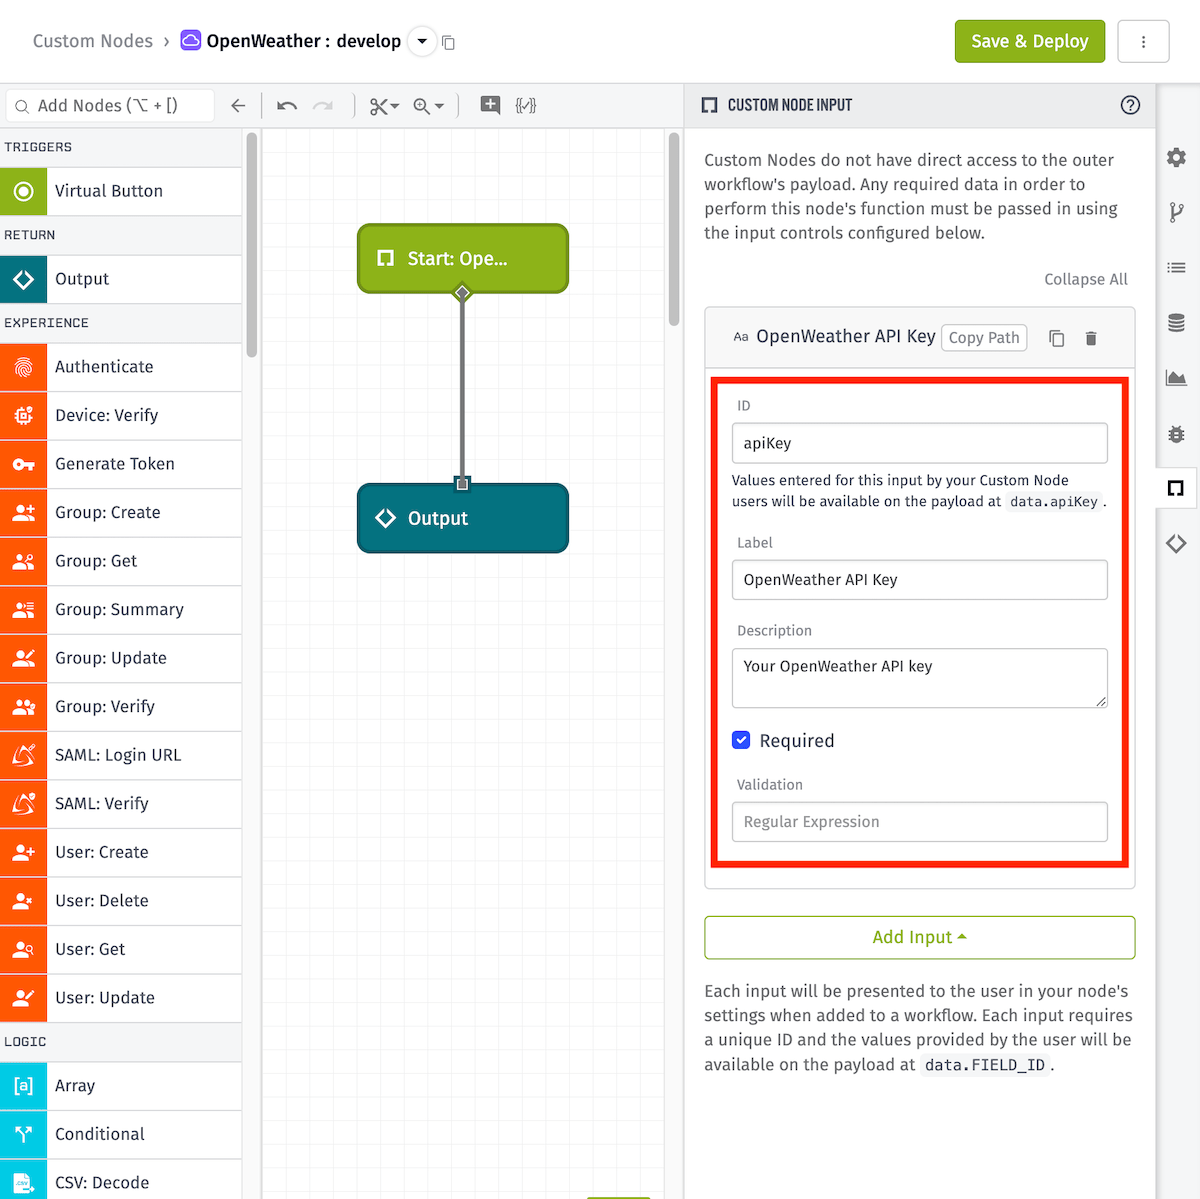
- ID — The property name at which the user’s input will be placed on the node’s
dataobject. Let’s enterapiKey, which can then be read using the payload pathdata.apiKey. - Label — The label displayed above the input field. In this case,
OpenWeather API Key. - Description — The text displayed below the input field. This allows us to give additional context to the information being requested, such as the required format. For this input, the ask is fairly straightforward, so we’ll keep it simple.
-
Required — Check this box if the input is necessary to the functionality of your node or outer workflow. This will require the user to enter a value before the node can be saved in a workflow. Making a request to the OpenWeather API requires an API key, so we’re going to check this box.
- If this box is not checked, an optional Default Value field will be available, which allows you to specify a value that will be used if no value is provided by the user.
- Validation — Validates that the user’s input is in a specific format. Although we could validate the API key is in a specific format, it’s not required for this example, so we’ll leave it blank.
GPS Latitude
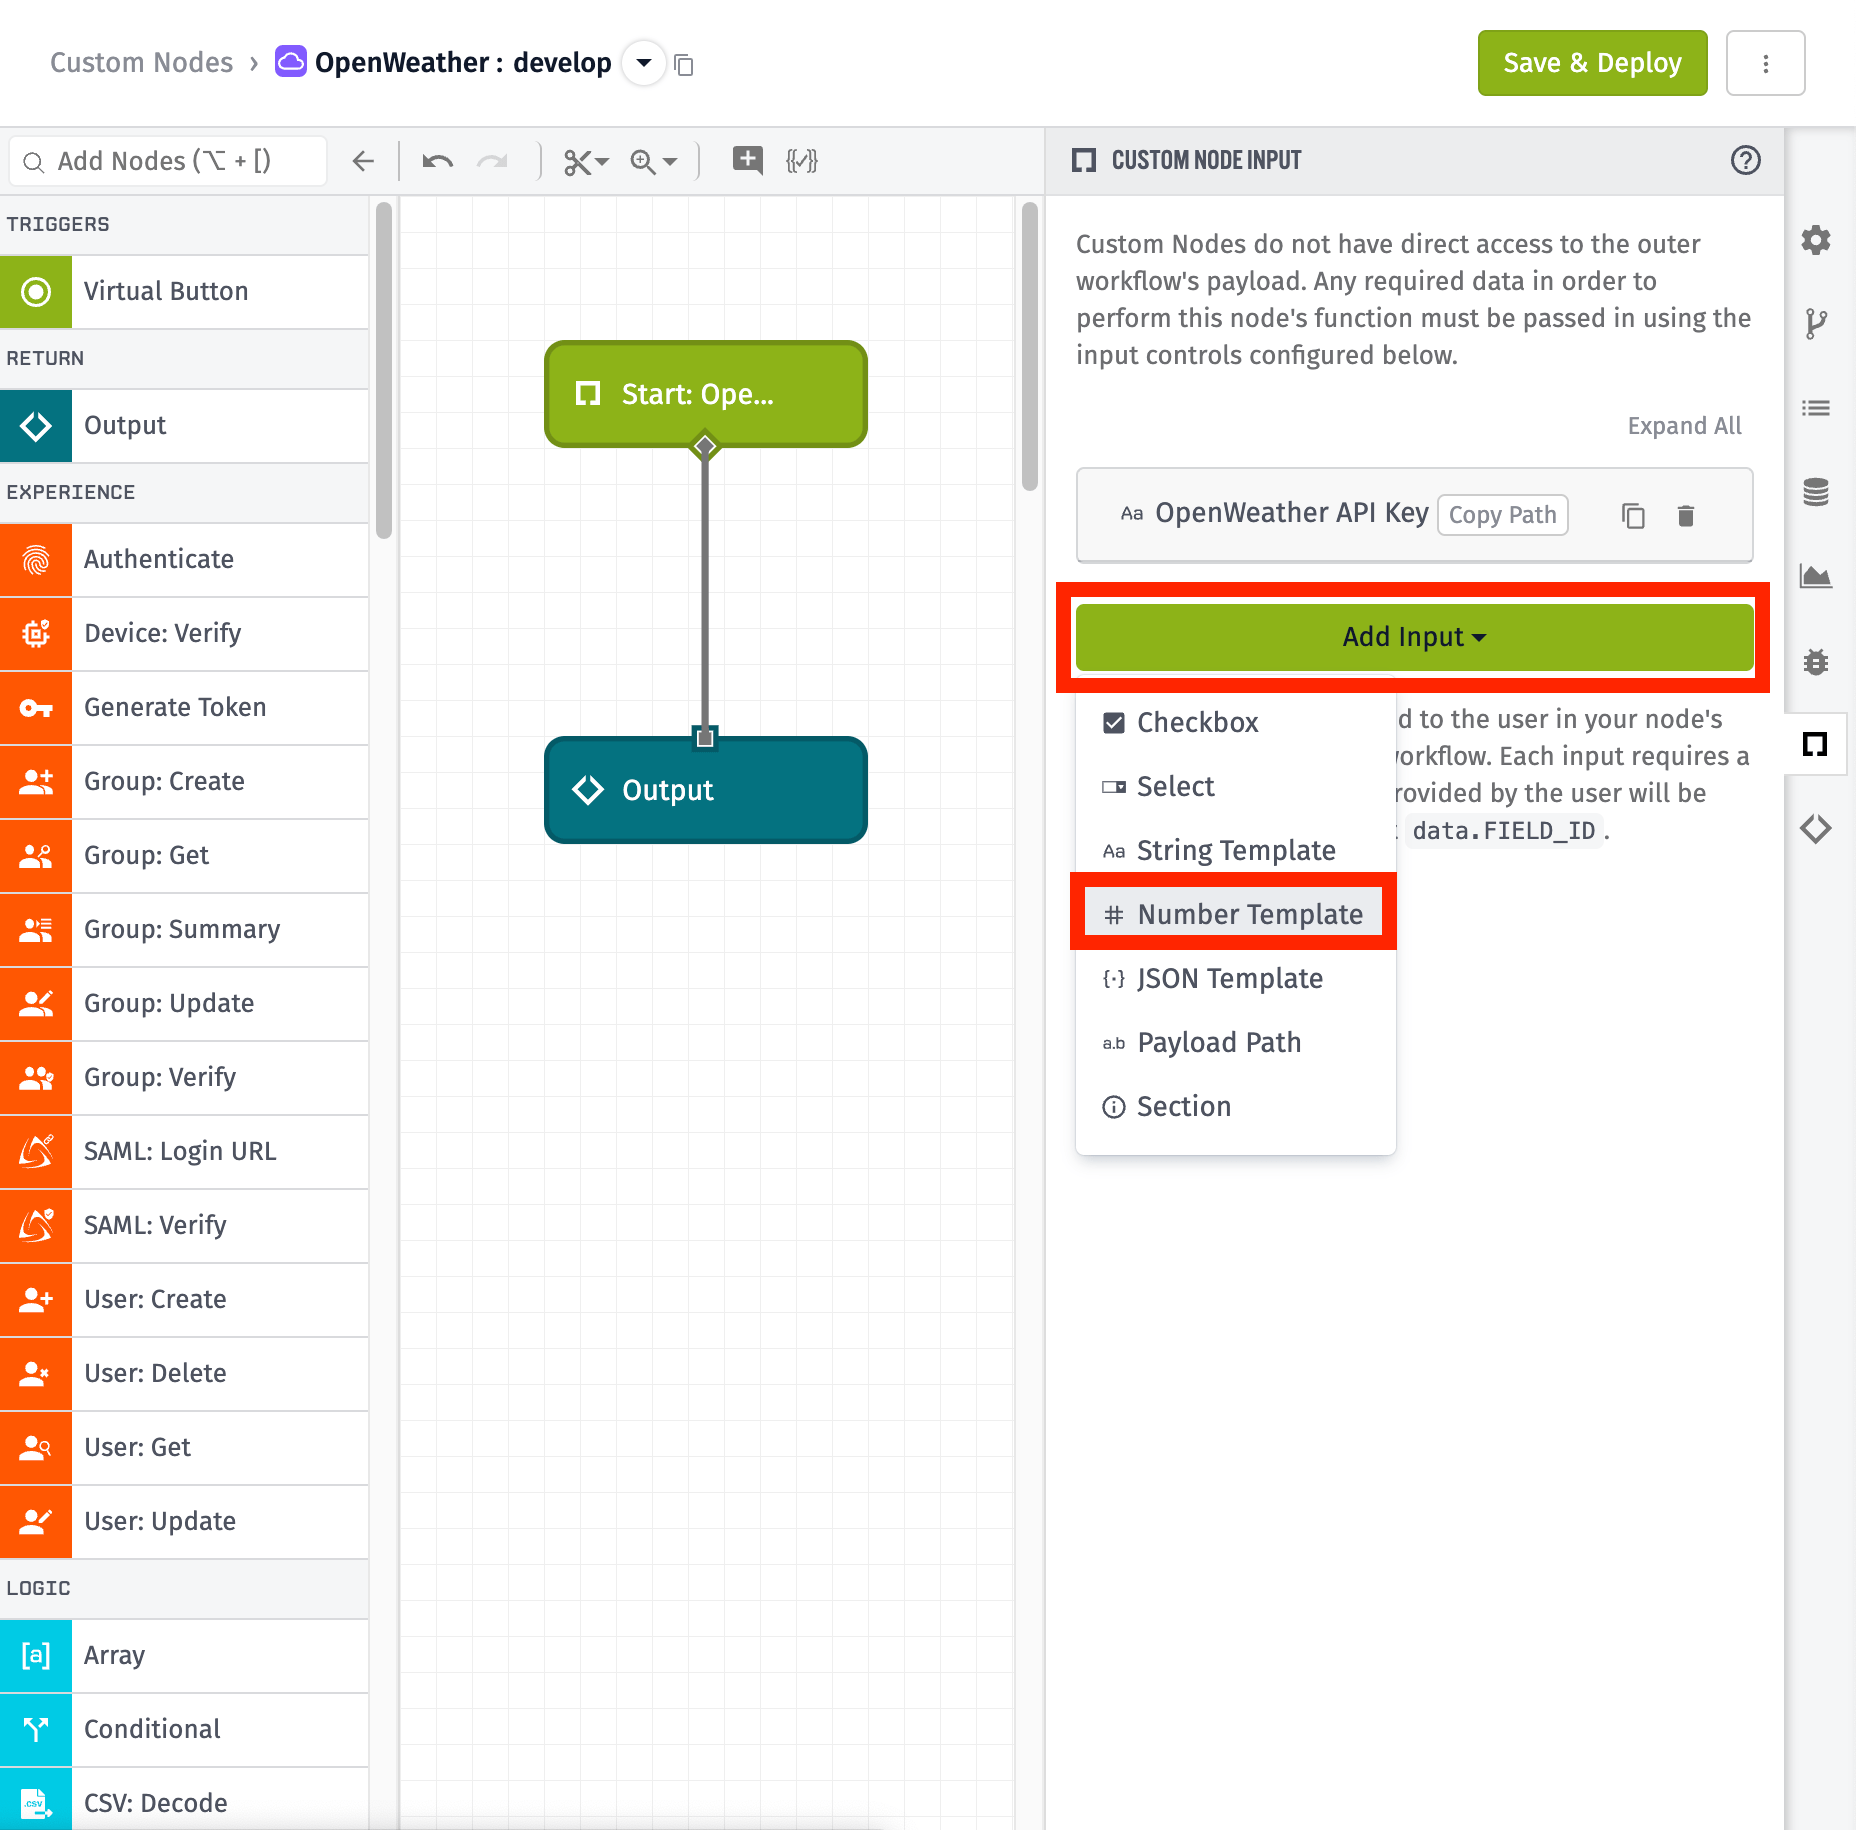
Next, we’ll configure an input for the GPS latitude. Click the Add Input button, but this time, select Number Template.
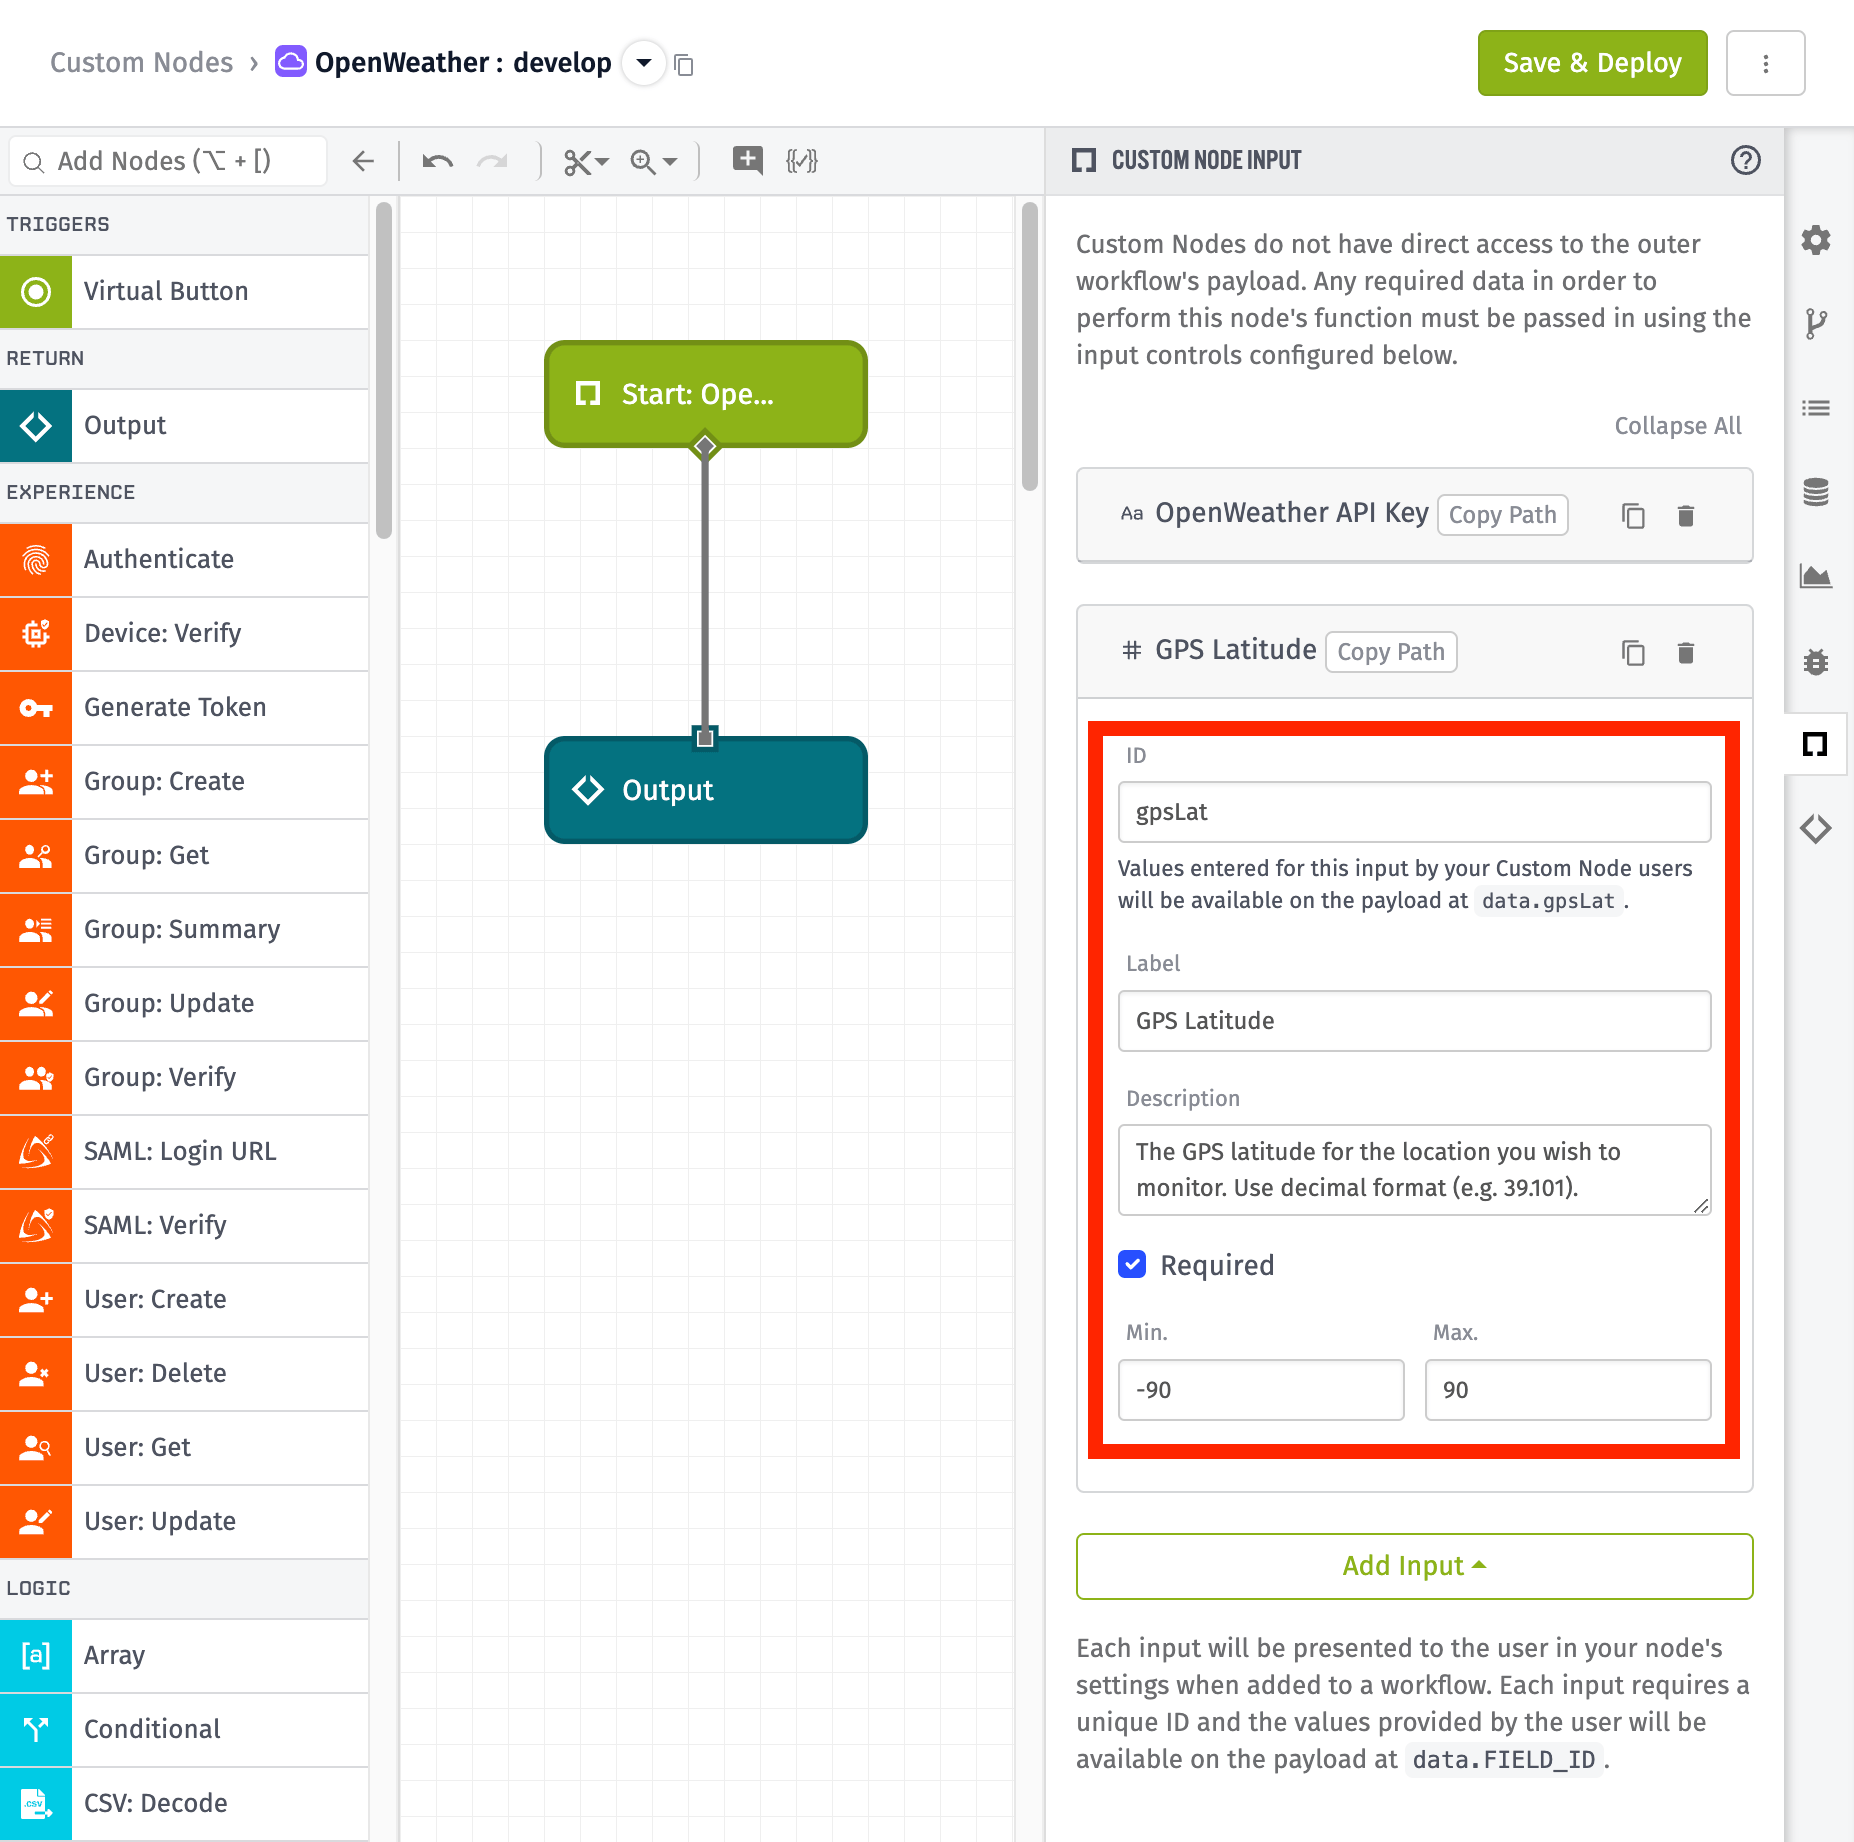
- ID — Enter
gpsLat, which will place the input at the payload pathdata.gpsLat. - Label — In this case,
GPS Latitude. - Description — There are a few different ways to format GPS coordinates. We want to ensure they’re entered in decimal format so that they can be easily submitted in an HTTP request without having to reformat any characters.
- Required — GPS coordinates will be required for this node to execute properly, so we’re going to check this box.
- Min. and Max. — Since we’re using a Number Template for this input, we can specify minimum and maximum numerical values to validate the user’s input. Set the Min value to
-90and the Max value to90, which will cover all possible latitudes.
GPS Longitude
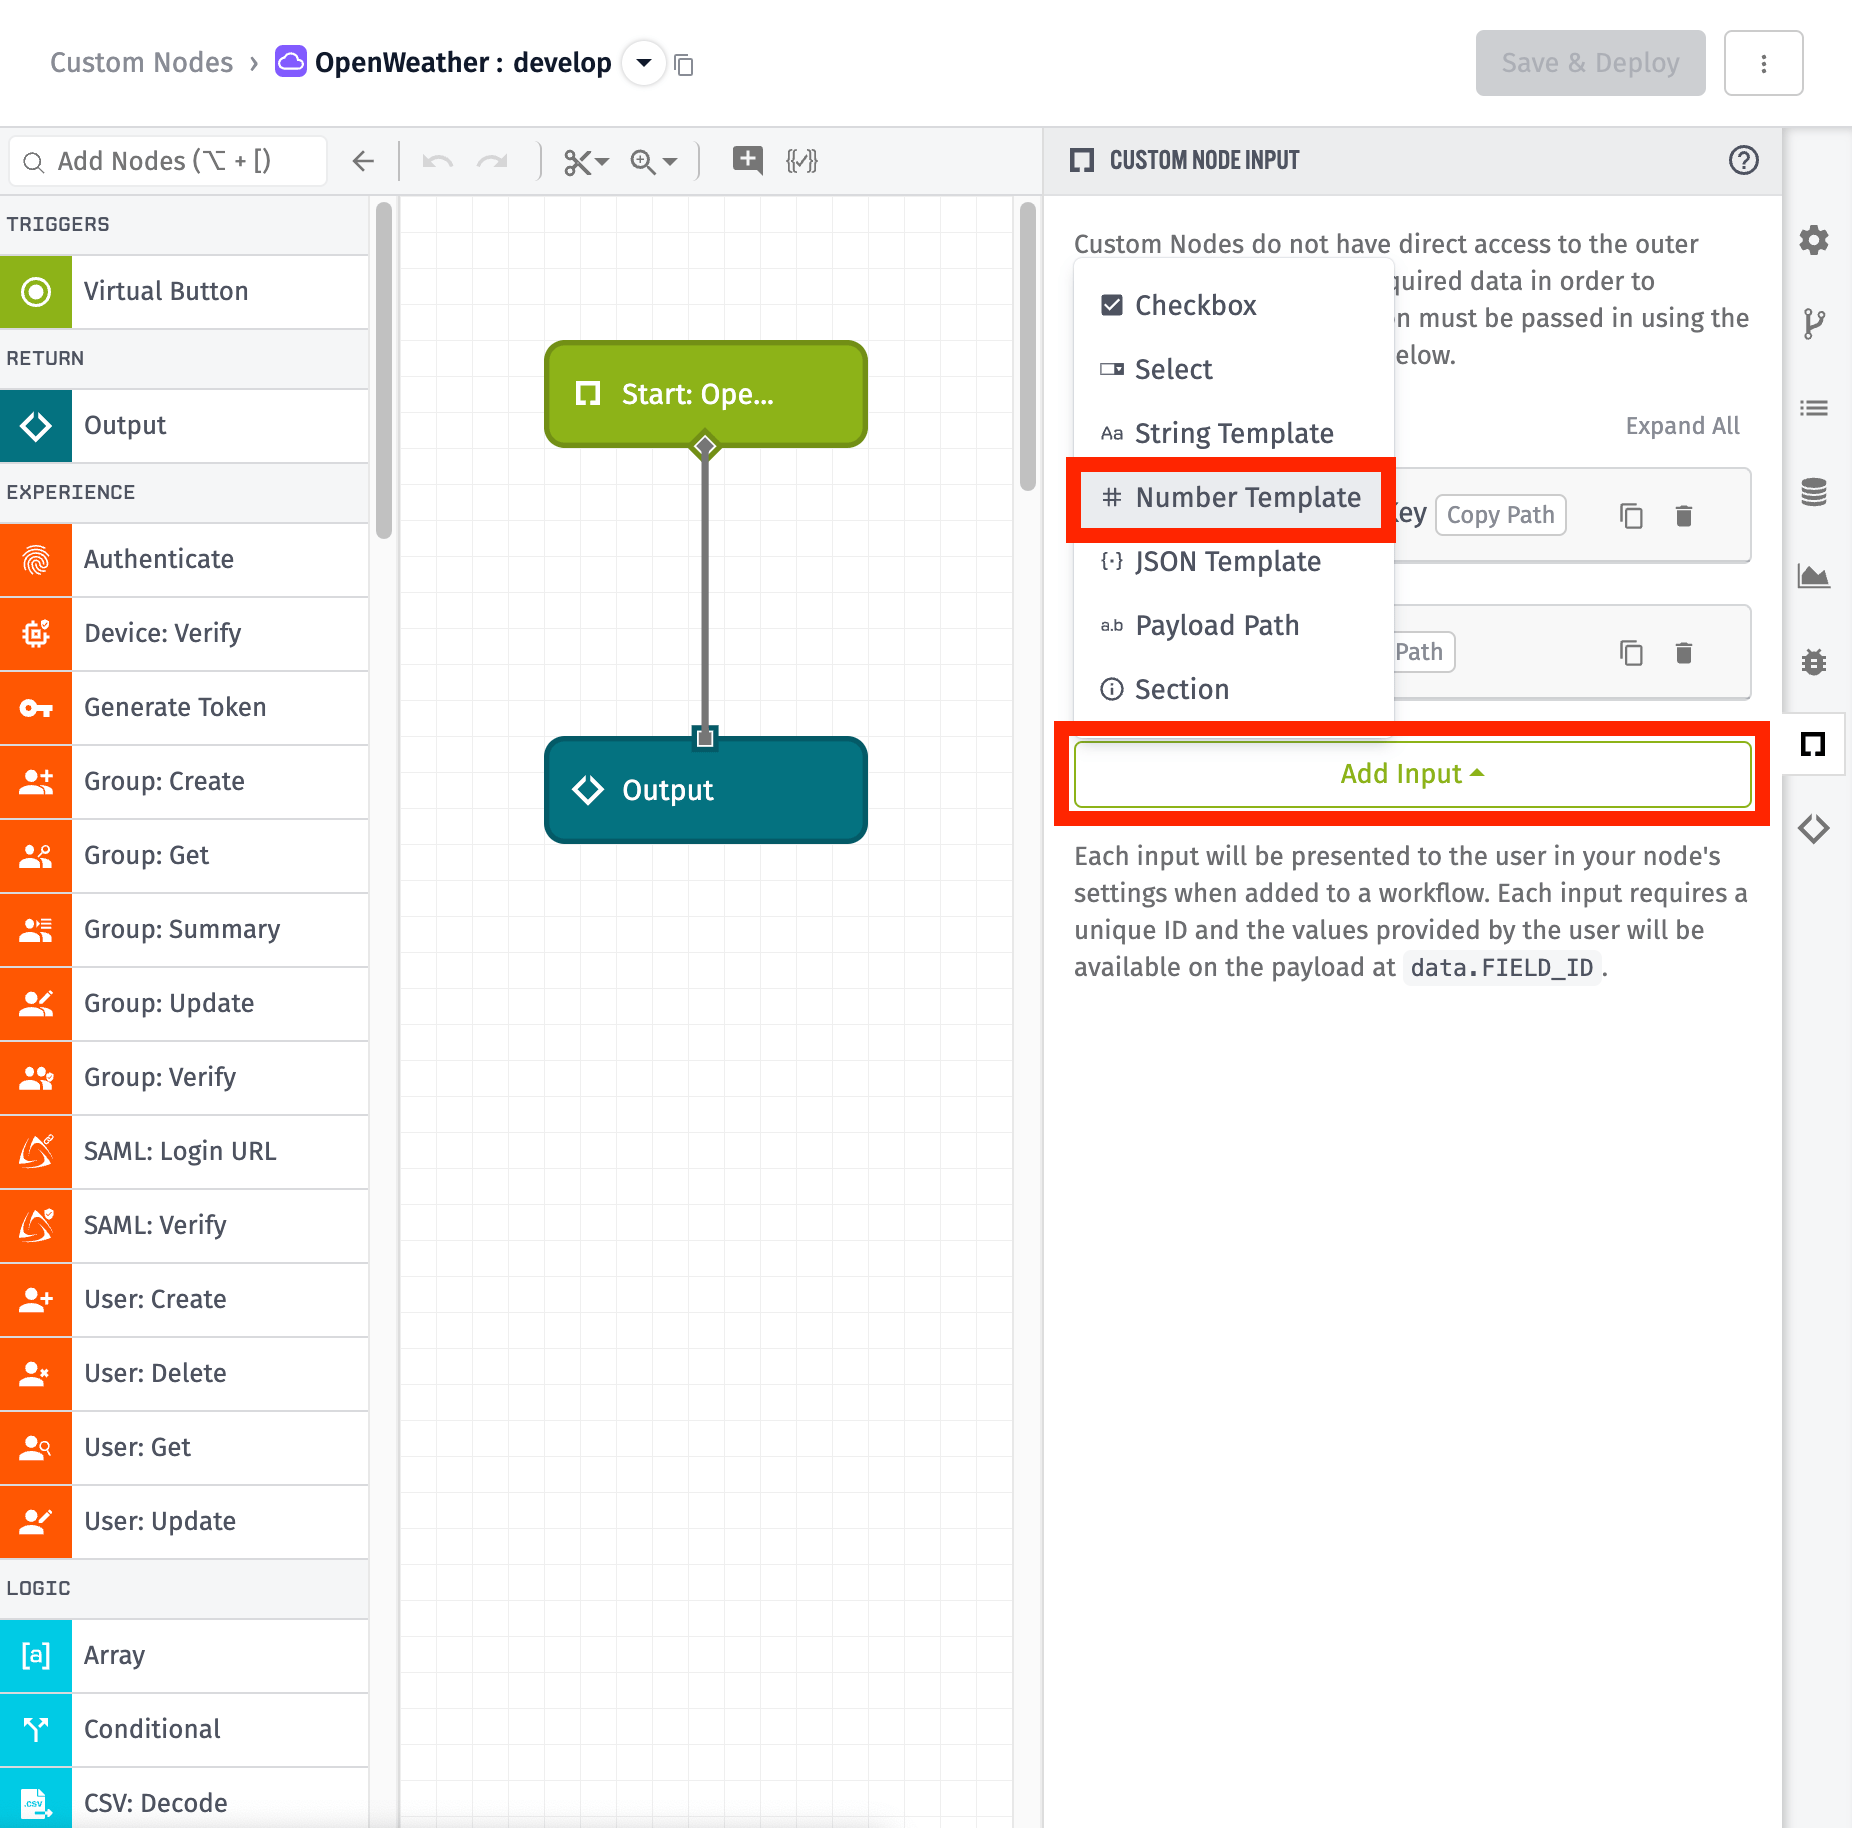
Lastly, we’ll configure an input for the GPS longitude. Click the Add Input button and once again, select Number Template.
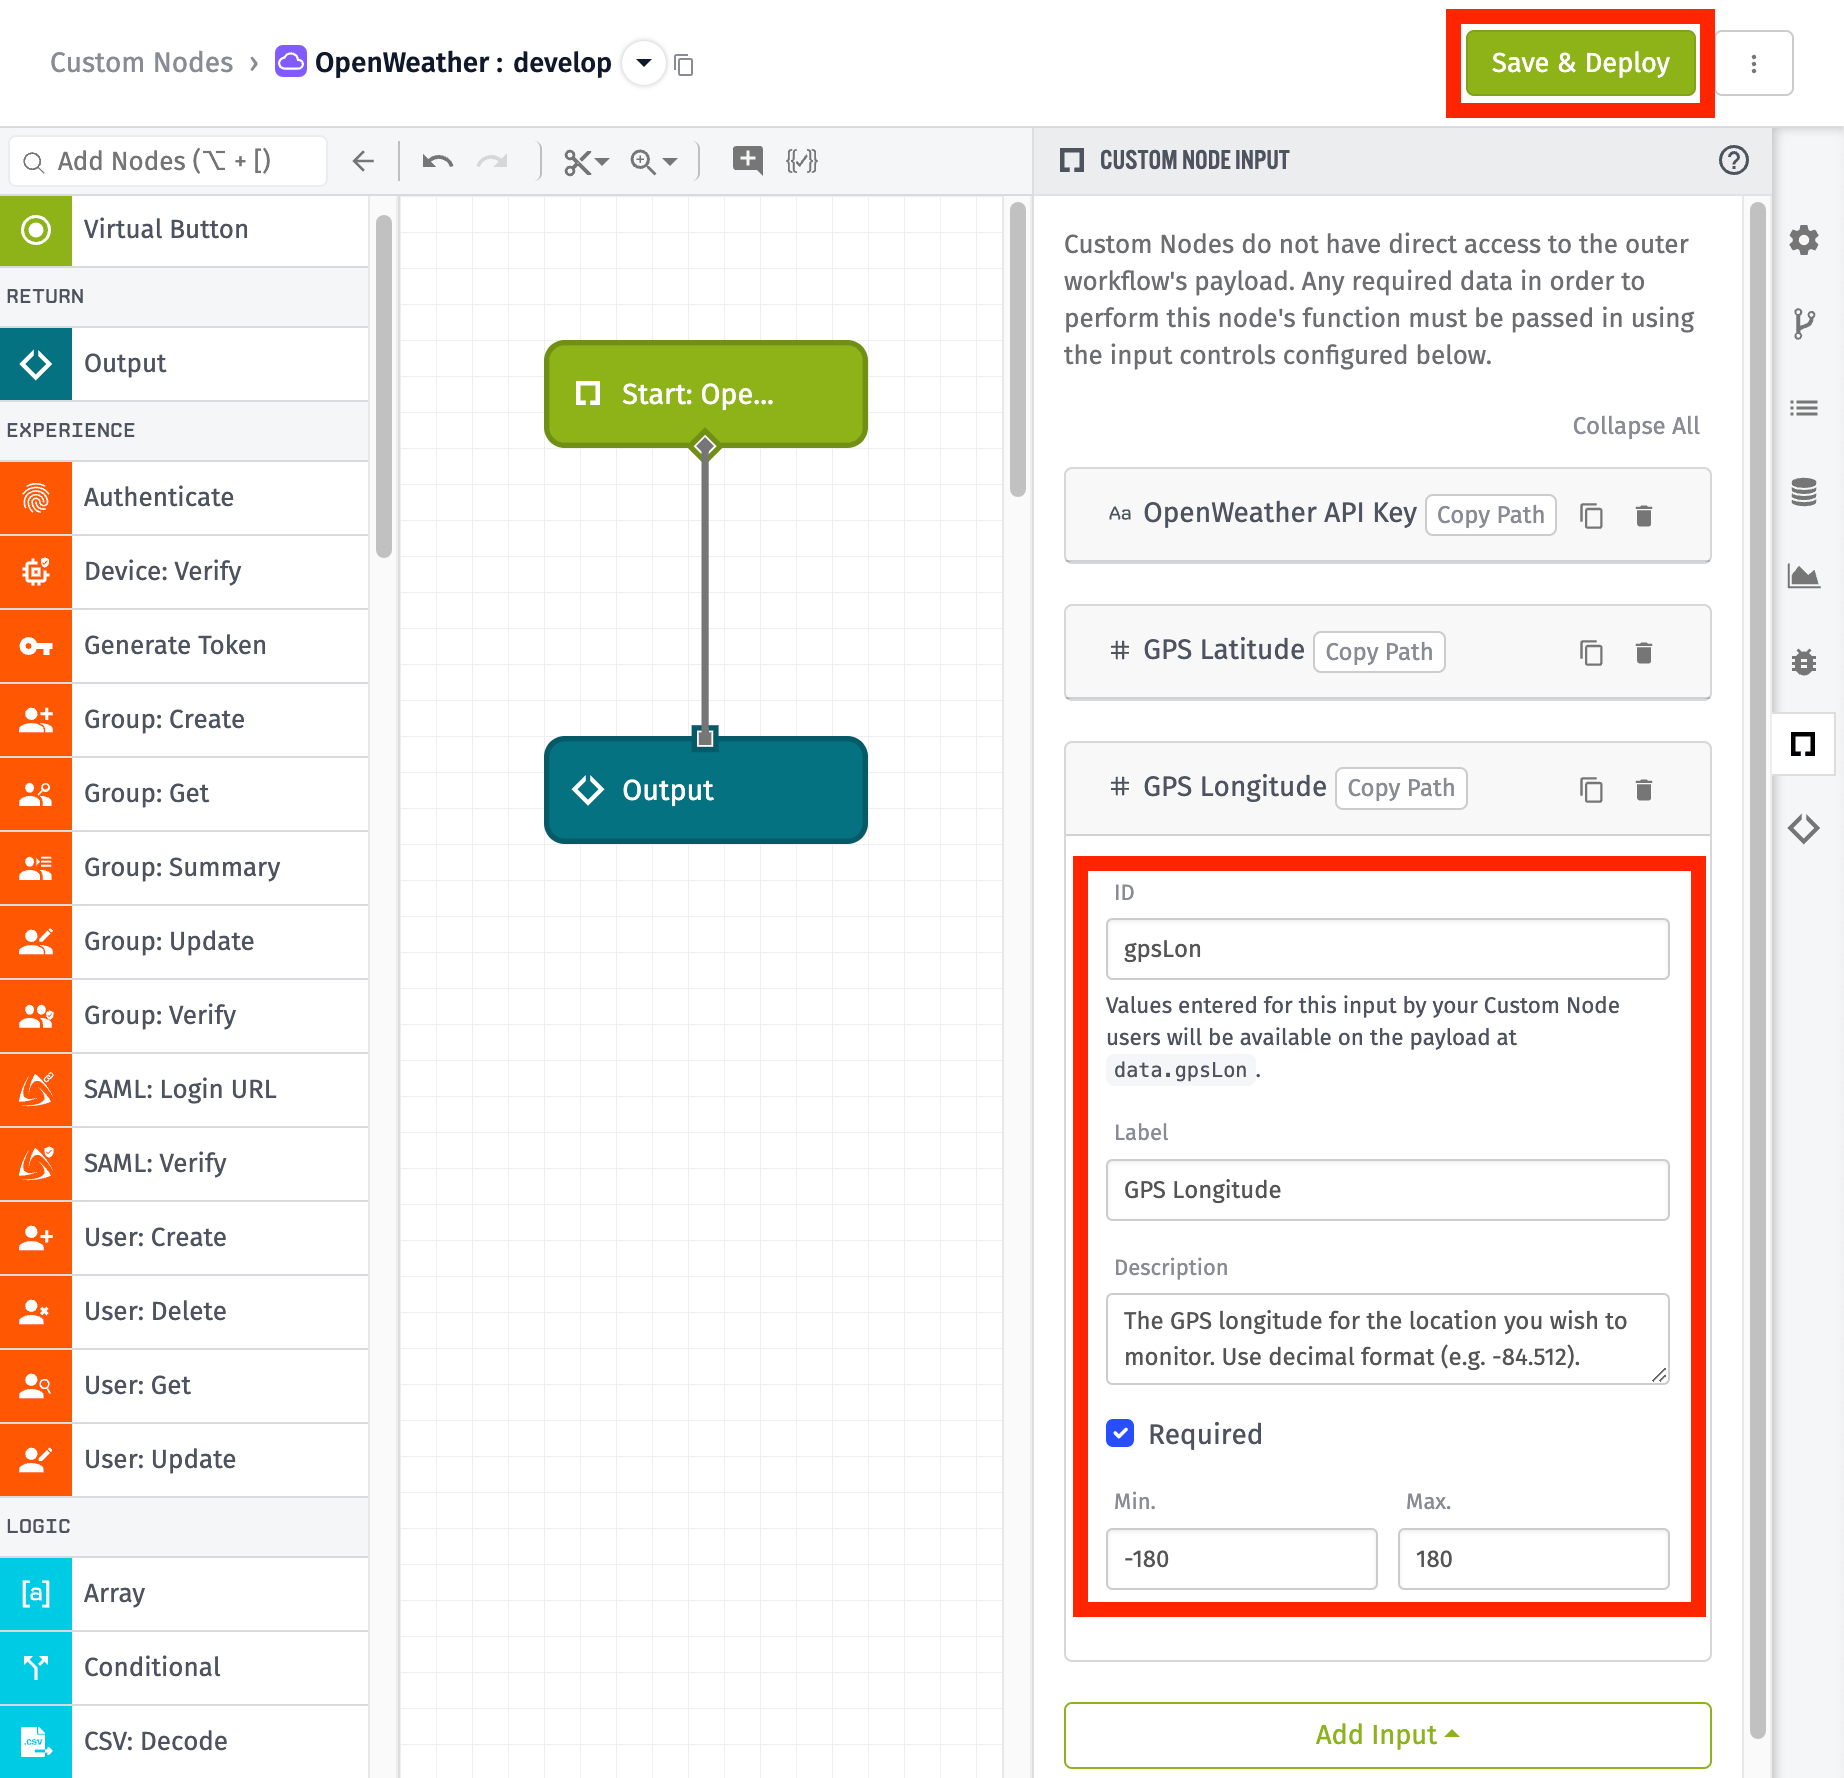
- ID — Enter
gpsLon, which will place the input at the payload pathdata.gpsLon. - Label — In this case,
GPS Longitude. - Description — Similar to the latitude input, this is an appropriate place to inform the user that the coordinates should be entered in decimal format.
- Required — GPS coordinates will be required for this node to execute properly, so we’re going to check this box.
- Min. and Max. — Since we’re using a Number Template for this input, we can specify minimum and maximum numerical values to validate the user’s input. Set the Min value to
-180and the Max value to180, which will cover all possible longitudes.
This is a good time to save your progress. Click Save & Deploy in the top-right.
The necessary input controls for this node are now configured. We’ve created three fields that require input from the user when using this node in a workflow. Each value will be placed on the starting payload at data.INPUT_ID, which in this case will look like:
{
  "data": {
    "apiKey": "users-openweather-api-key",
    "gpsLat": "users-gps-latitude",
    "gpsLon": "users-gps-longitude"
  }
  ...
}
Now that we’ve required the user to input the necessary information, we can build our node to make a request to the OpenWeather API and return current weather information.
Building Your Node
Custom Nodes are developed a lot like workflows — they are made by combining other nodes together into a reusable bundle. As you saw earlier, when you first create a new Custom Node, you’ll see a Start: Custom Node Trigger and Output Node already on your canvas.
Start: Custom Node Trigger
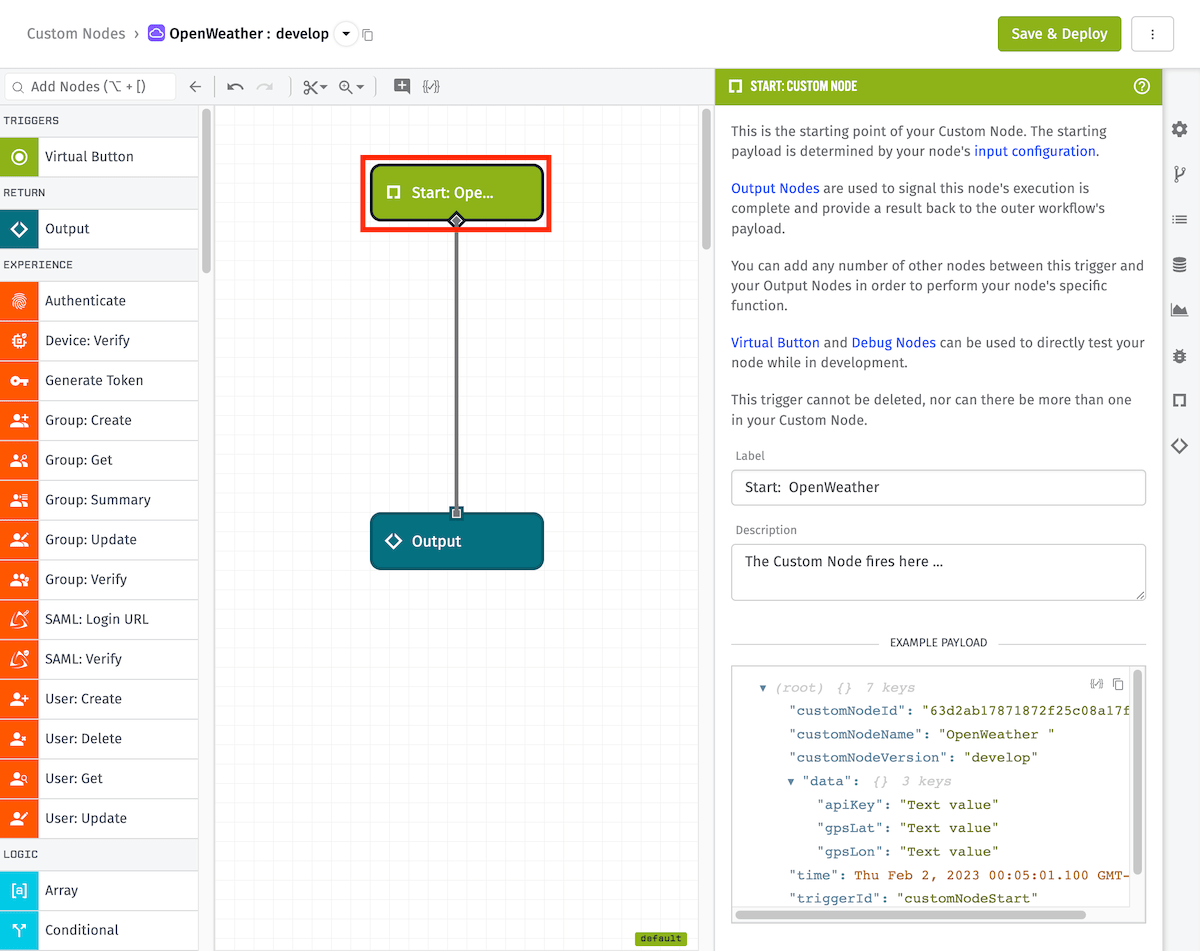
Unlike workflows, which can be initiated by a variety of triggers, a Custom Node can only be initiated in one of two ways:
- During testing, using the Virtual Button Trigger, which we’ll discuss a bit later.
- Once deployed, by being invoked by the outer workflow, which is symbolized by the Start: Custom Node Trigger.
You can change the Label and Description if you’d like, but no configuration of this node is necessary.
HTTP Node
Add an HTTP Node between the Start: Custom Node Trigger and the Output Node. This will make the API request to OpenWeather.
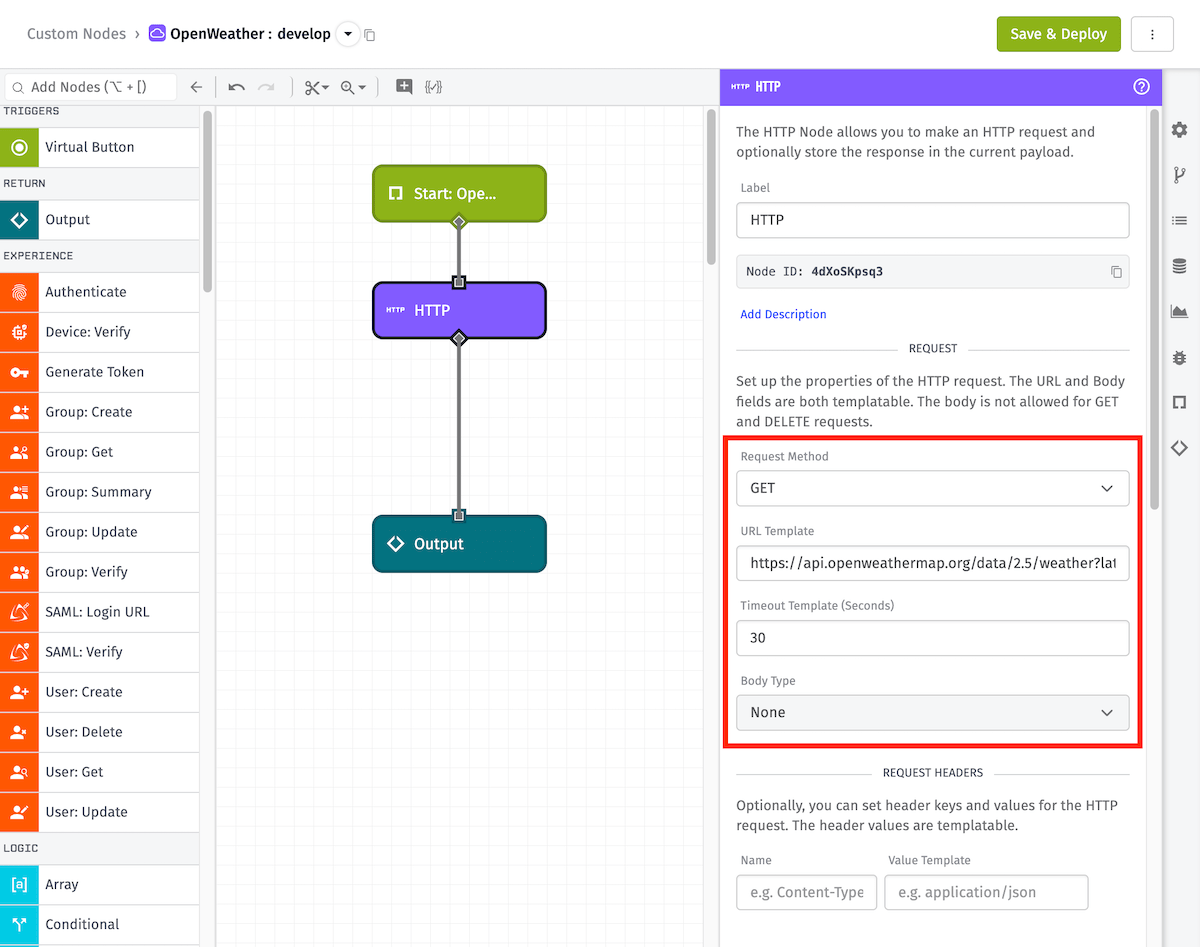
- Request Method — Select
GET, as we’re only retrieving data. -
URL Template — Enter the following:
- https://api.openweathermap.org/data/2.5/weather?lat={{data.gpsLat}}&lon={{data.gpsLon}}&appid={{data.apiKey}}
- We’re using templates to reference the data paths specified earlier in the input controls for the the latitude, longitude, and API key. For more information on formatting URLs for the OpenWeather API, click here.
- Timeout Template (Seconds) — We’re setting this to
30. This reduces the chance of the outer workflow timing out. - Body Type — Since we’re not sending a body in this request, this field is locked.
The Request Headers, Authorization, and SSL Options sections can be left blank, as they aren’t needed for this request. Scroll down to the Response and Error sections.
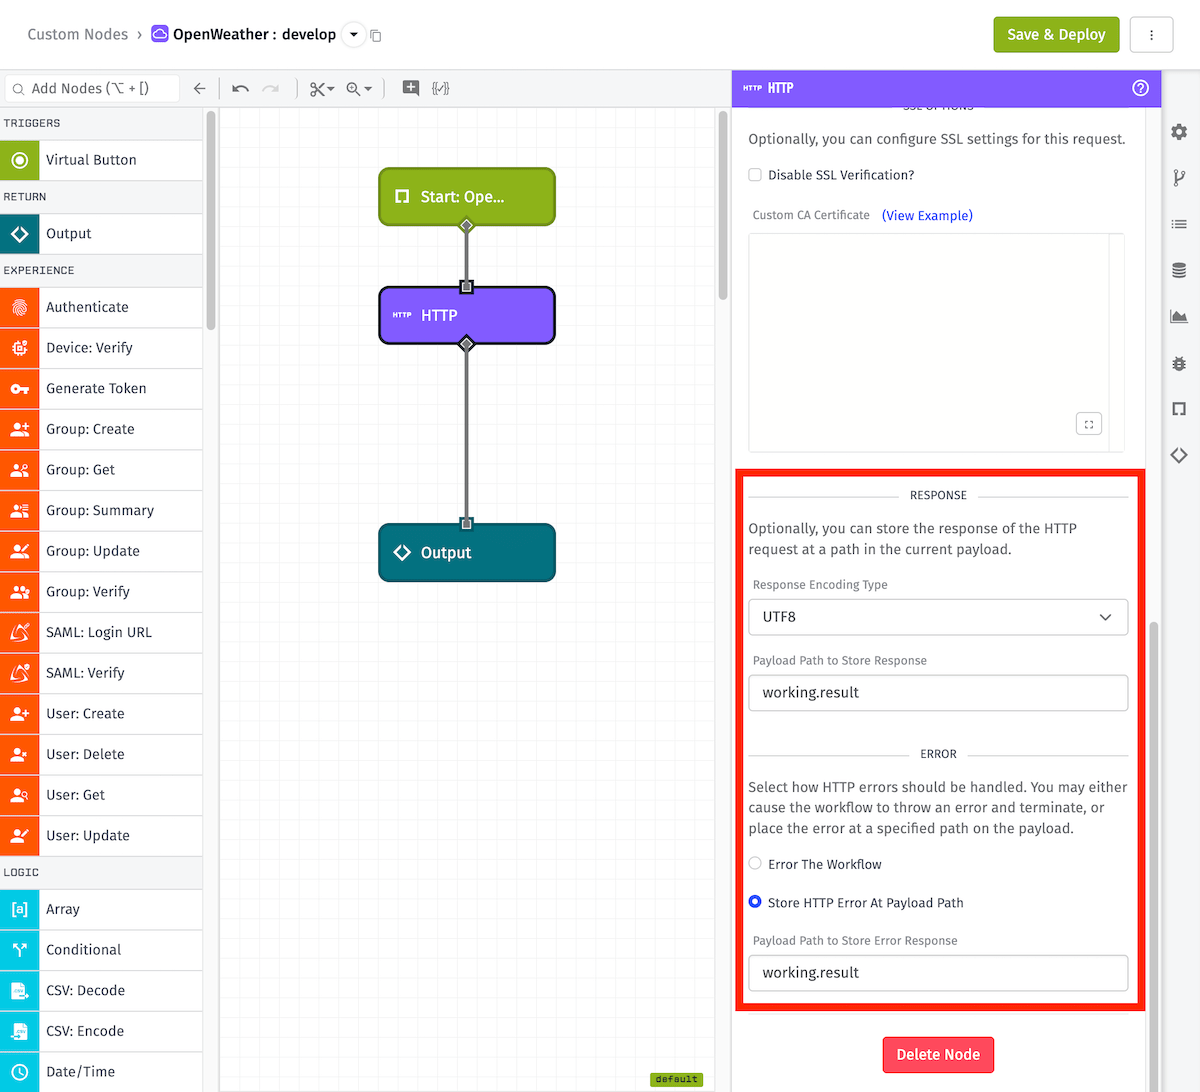
- Response Encoding Type — Leave this as
UTF-8, the format in which we’ll be receiving a response. -
Payload Path to Store Response — Set to
working.result. This will store the result of this API request back on our payload at theworking.resultpayload path.- Using the
workingobject inside workflows and Custom Nodes is a recommended best practice because it keeps the original user input on thedataobject unaltered —workingwill not conflict with anything WEGnology provides by default. However, you can use a different path if you’d like.
- Using the
-
Error — Select the
Store HTTP Error At Payload Pathoption. API requests can fail for a variety of reasons. This option will cause the node to place anerrorobject on the payload path in the event of a failure, rather than causing the entire node to throw an error.- This is in line with our recommended best practice for how nodes should output data — if the node produces an error for any reason, the result data should be an object with an
errorproperty that contains further details. This provides a standard way for users to handle errors across all nodes.
- This is in line with our recommended best practice for how nodes should output data — if the node produces an error for any reason, the result data should be an object with an
- Payload Path to Store Error Response — Set to
working.result. You may notice this is the same payload path as the successful response, but since we’re going to pass through either the response or the error, this works well for us.
Output Node
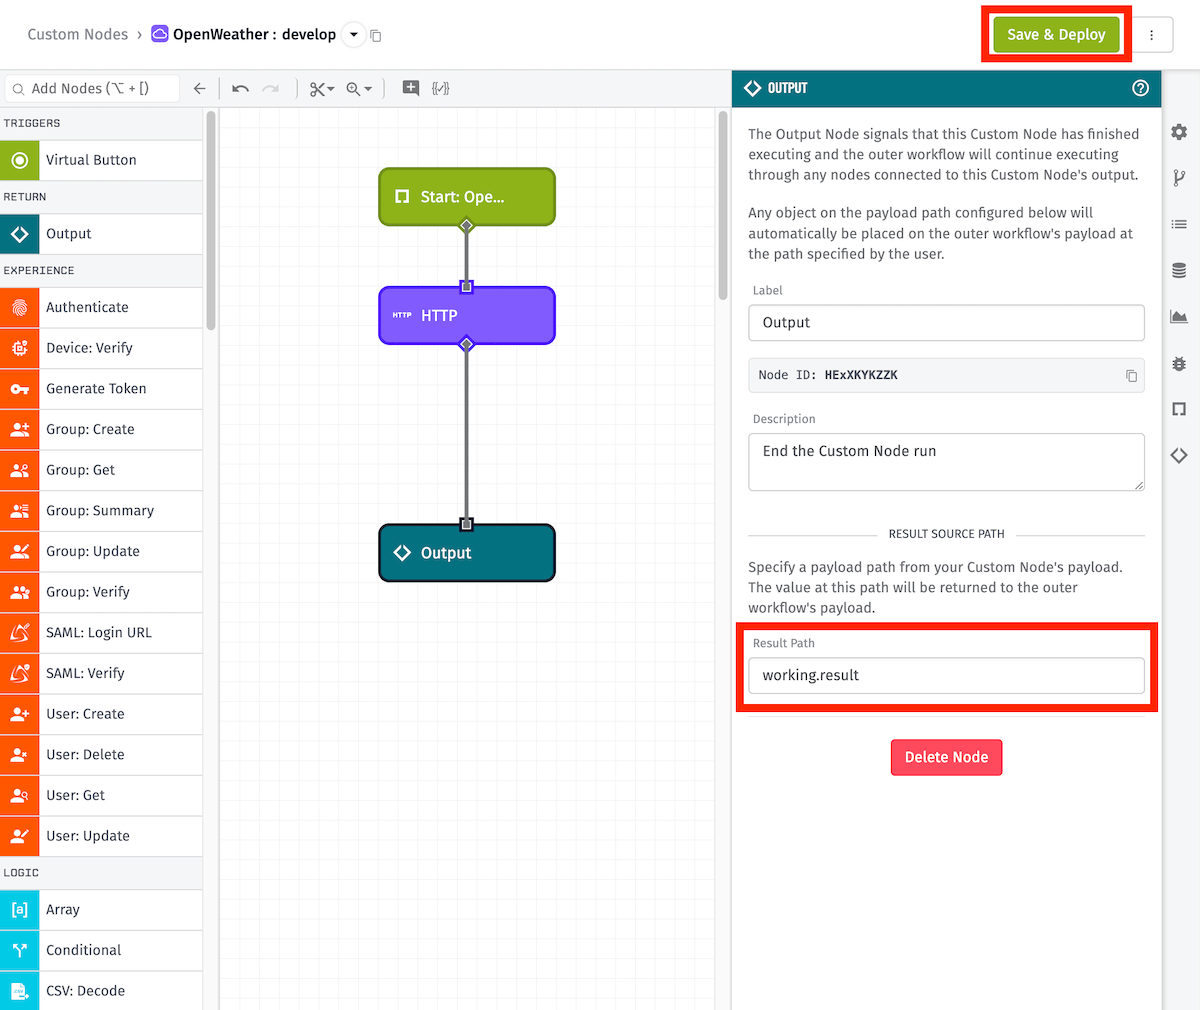
Custom Nodes are also unique in that they have access to the Output Node, which passes a payload path from the Custom Node back to the outer workflow’s payload.
- Result Path — Set to
working.result. This is the path we configured to store the result of the API request, which will be returned to the outer workflow.
Congratulations, your Custom Node has been configured! Click the Save & Deploy button on the top-right.
Testing Your Node
Before delivering this node to your users, it should probably be tested. As with application workflows, the easiest way to test your Custom Node is by using one or more Debug Nodes and Virtual Button Triggers.
Debug Node
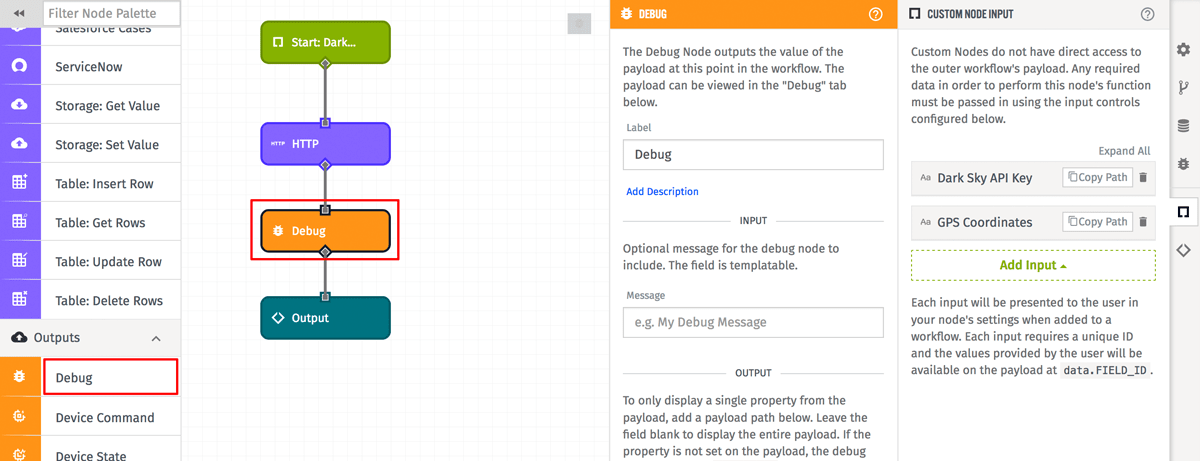
Start by adding a Debug Node between the HTTP Node and the Output Node. This will allow us to inspect payloads and make sure that the node is functioning properly. No configuration of this node is necessary for the purposes of this walkthrough.
Virtual Button Trigger
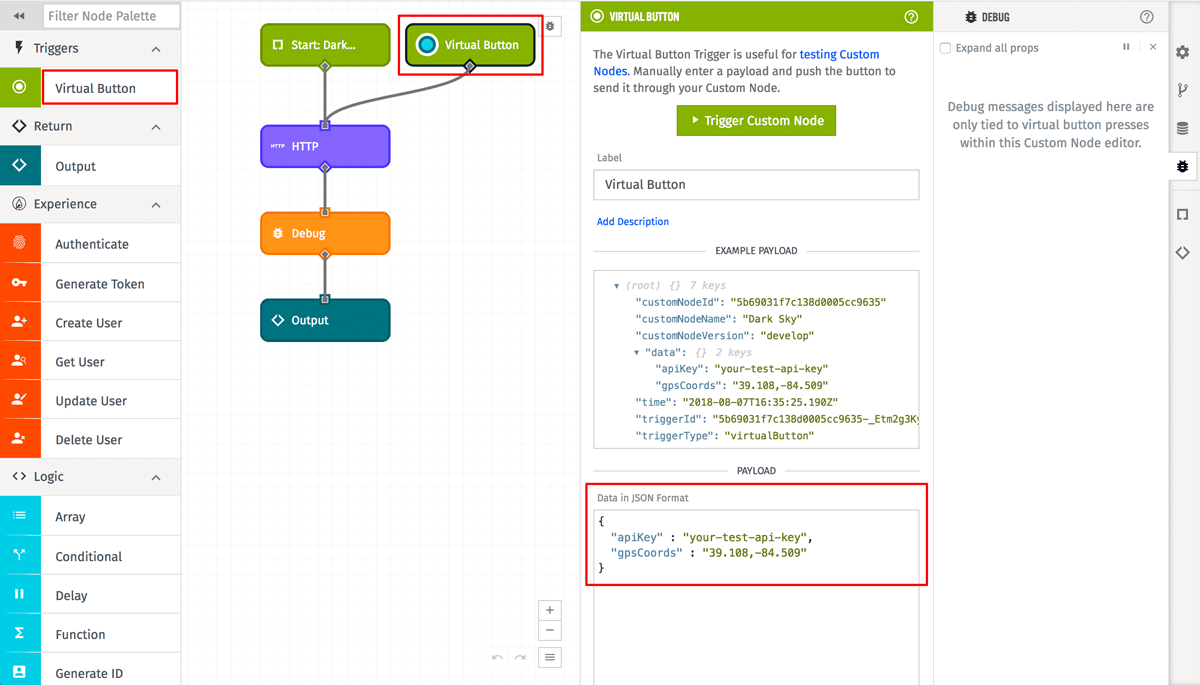
Next, add a Virtual Button Trigger before the HTTP Node, alongside the Start: Custom Node Trigger. This will allow us to simulate the activation of this node, as if it were invoked by the outer workflow, along with a test payload. In the configuration panel, scroll down to the Payload section.
- Payload — Here, you can enter data in JSON format. This will be placed in the
datapath of the test payload. In order to simulate an actual payload that would be created using the inputs entered by the user, let’s enter the following values (Note thatyour-api-keyshould be substituted with your OpenWeather API key):
{
  "apiKey": "your-api-key",
  "gpsLat": "39.101",
  "gpsLon": "-84.512"
}
Now, click the Save & Deploy button on the top-right. Your node is now ready to be tested!
Debug Panel
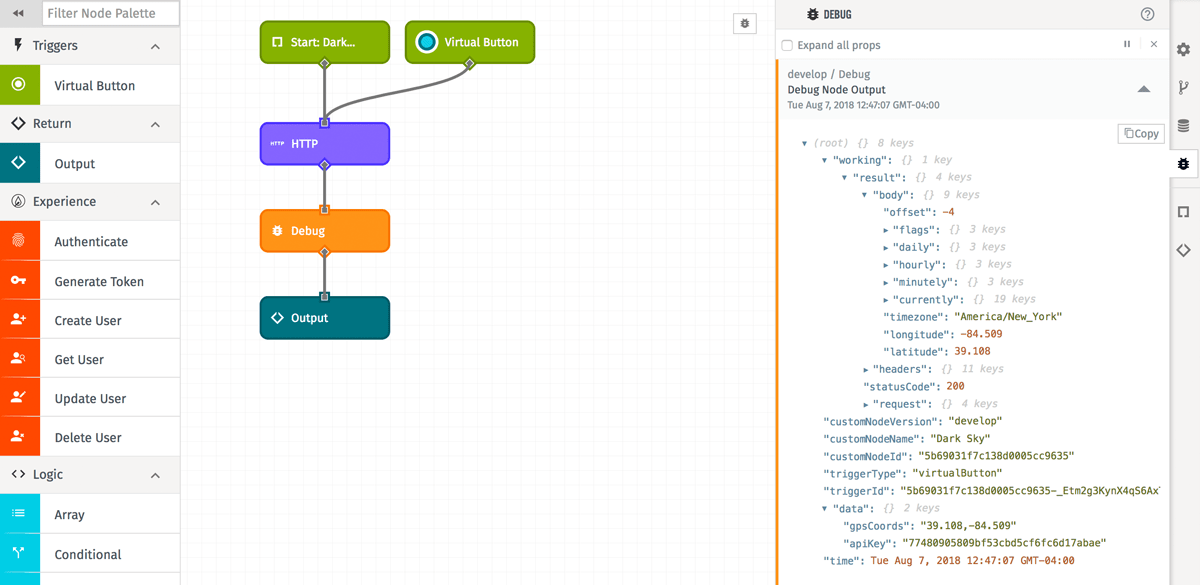
- 1 — Click the blue button inside the Virtual Button Trigger. This kicks off the Custom Node with the test payload we configured above.
- 2 — Click the Debug tab on the right-side menu bar. This will show you a live feed of any payloads that hit the Debug Node.
- 3 — Click the down arrow to the right of the Debug Node Output event that was just created. This will show you the details of the payload, along with the API response.
- 4 — Click the arrow to the left of
data. You should see the data we entered in the Payload section of the Virtual Button Trigger. -
5 — Click the arrows to the left of
working,result, andbody. This is the path we specified in the HTTP Node configuration earlier to store the response of the API request.- If the request was successful, you should see a number of relevant objects, such as
cloudsandweather, which you can expand to see details. - If there was an error with the request, you’ll see a
messageobject containing the reason for the error, such asInvalid API key.
- If the request was successful, you should see a number of relevant objects, such as
Once you’ve completed your testing, if this Custom Node is going to be available to anybody else…
- Make sure that you remove your API key from the Virtual Button payload. Be aware that if you export your Custom Node, the Virtual Button payload will be included.
- Note that when a Custom Node is executed by a workflow, outputs from the Custom Node’s Debug Nodes can be displayed in the workflow’s Debug panel. While the node that we’ve built in this walkthrough doesn’t contain any sensitive information (aside from the aforementioned API key), it’s an important consideration when creating your own Custom Nodes.
Click Save & Deploy again, if necessary, before moving forward.
Versioning Your Node
Just like workflows, Custom Nodes support versioning, which is an important final step when delivering this node to your users. You can create multiple versions of the node as you add new functionality or fix bugs. When a user adds your node to a workflow, they will have the option to choose the version to use.
The only version of a Custom Node that can be edited is the develop version. This version can also be used in workflows, but can cause unintended side effects since any changes you make to develop will immediately be applied to any workflows using this node. This is why it’s important to create versions and use specific versions in your workflows. This will allow you to continue developing this node without impacting any workflows using a previous version.
Start by clicking the Versions tab on the right-side menu bar and clicking the Create New Version button.
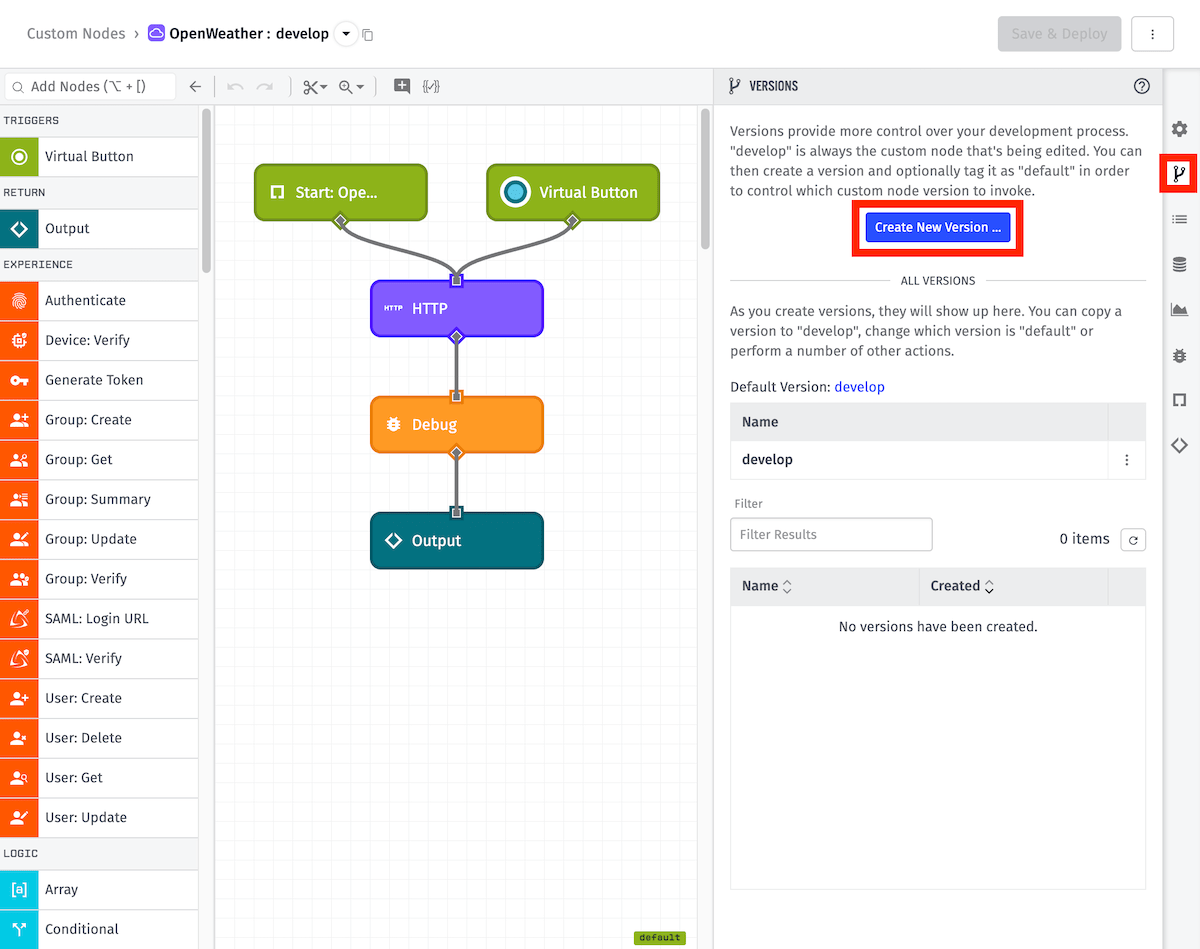
You’ll be presented with a popup window to enter the details of your version.
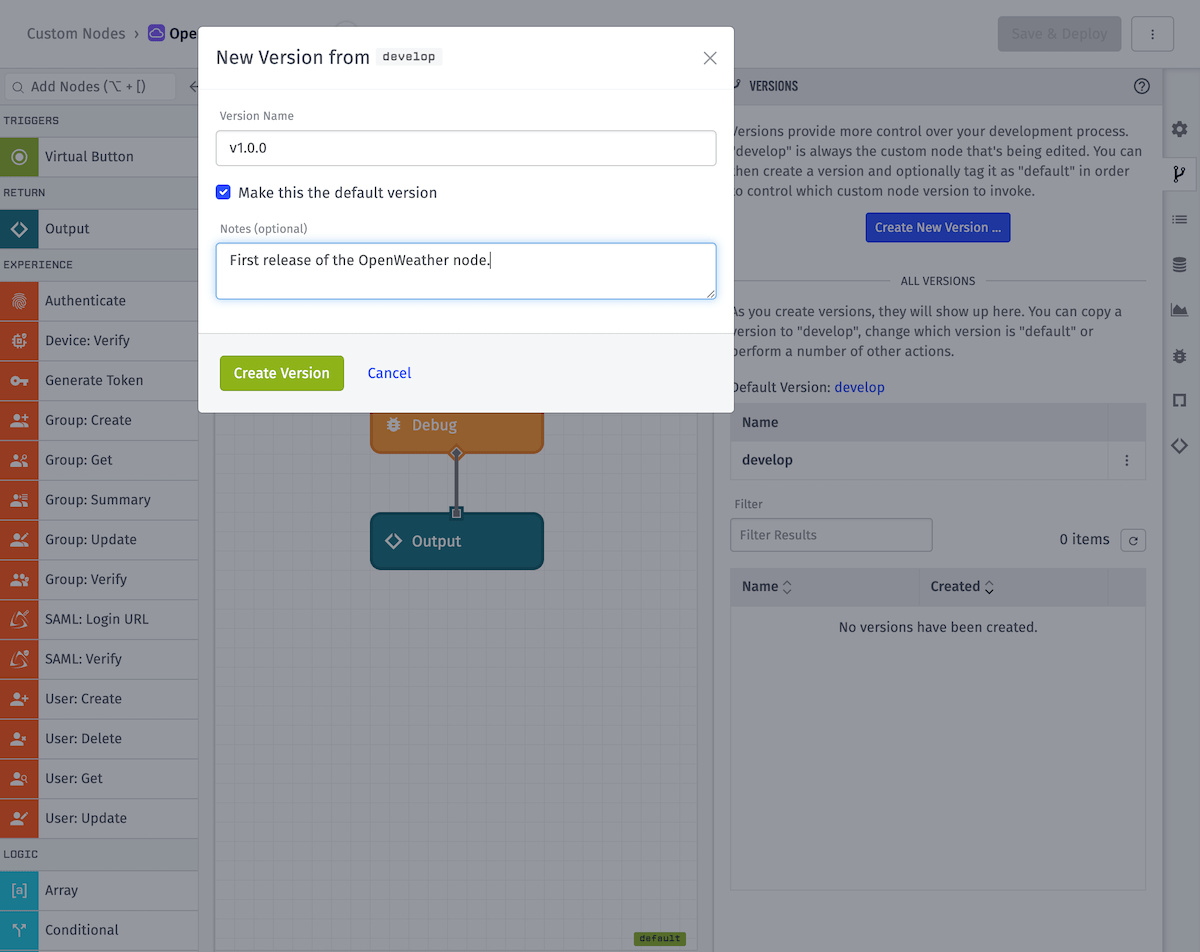
- Version Name — Our recommended best practice for versioning nodes is to follow Semantic Versioning. This helps communicate to your users how much impact each version will have and provides a standard across all nodes. Let’s version our OpenWeather node as
v1.0.0. -
Make this the default version — Checking this box will make this the default version selected in the configuration panel when this node is used in a workflow. For the purposes of this walkthrough, go ahead and check this box.
- When making multiple versions of Custom Nodes, you should consider which version you want to use as the default. While this will vary depending on the purpose of your node and your versioning practices, you generally want your most recent stable version to be set as the default.
- Notes — Optional, but we recommend putting in a brief description that includes any changes or additions that have been implemented. This field becomes more relevant as you create additional versions.
Click the Create Version button.
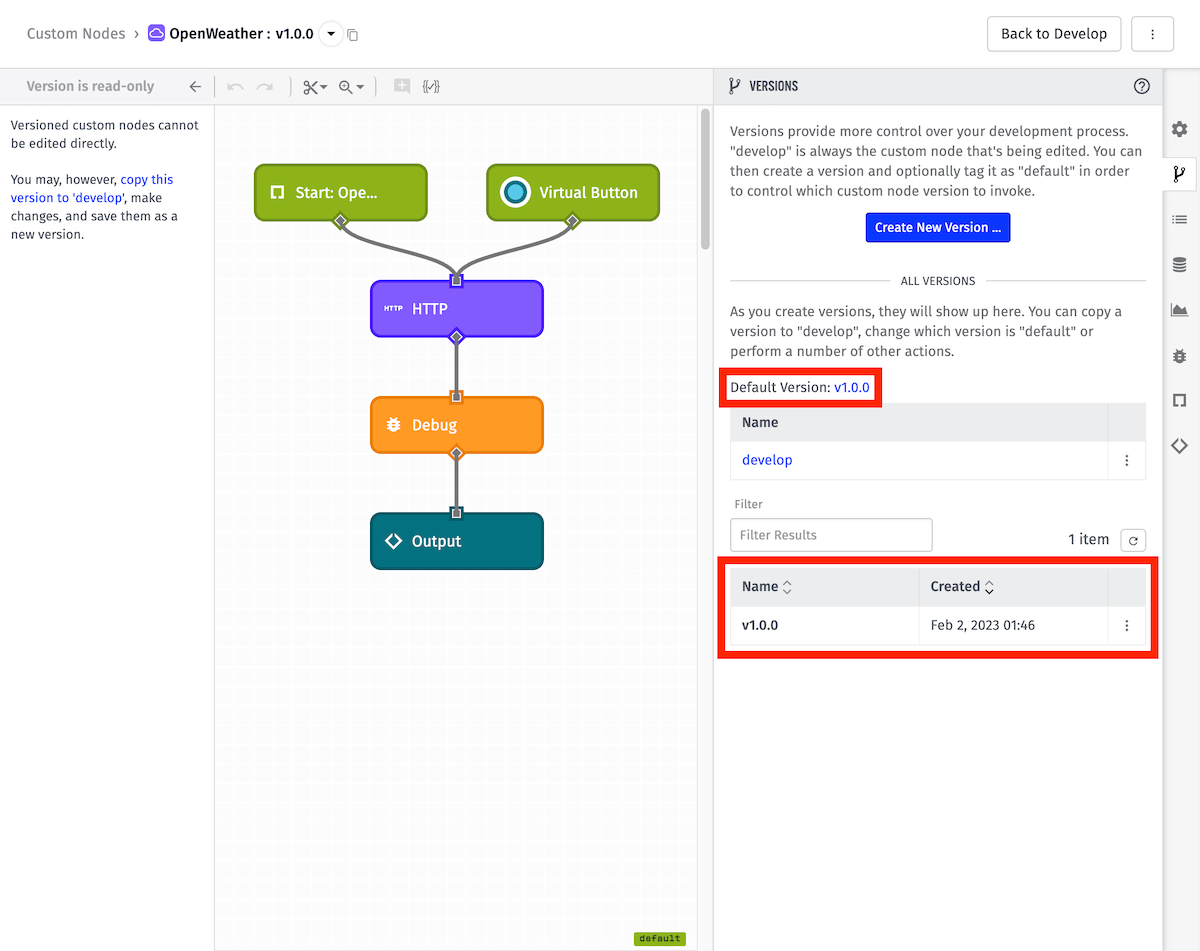
You’ll now see the newly created version listed in the Versions tab. Additionally, if you set this version as the default version, you’ll see this reflected as well.
Using Your Node
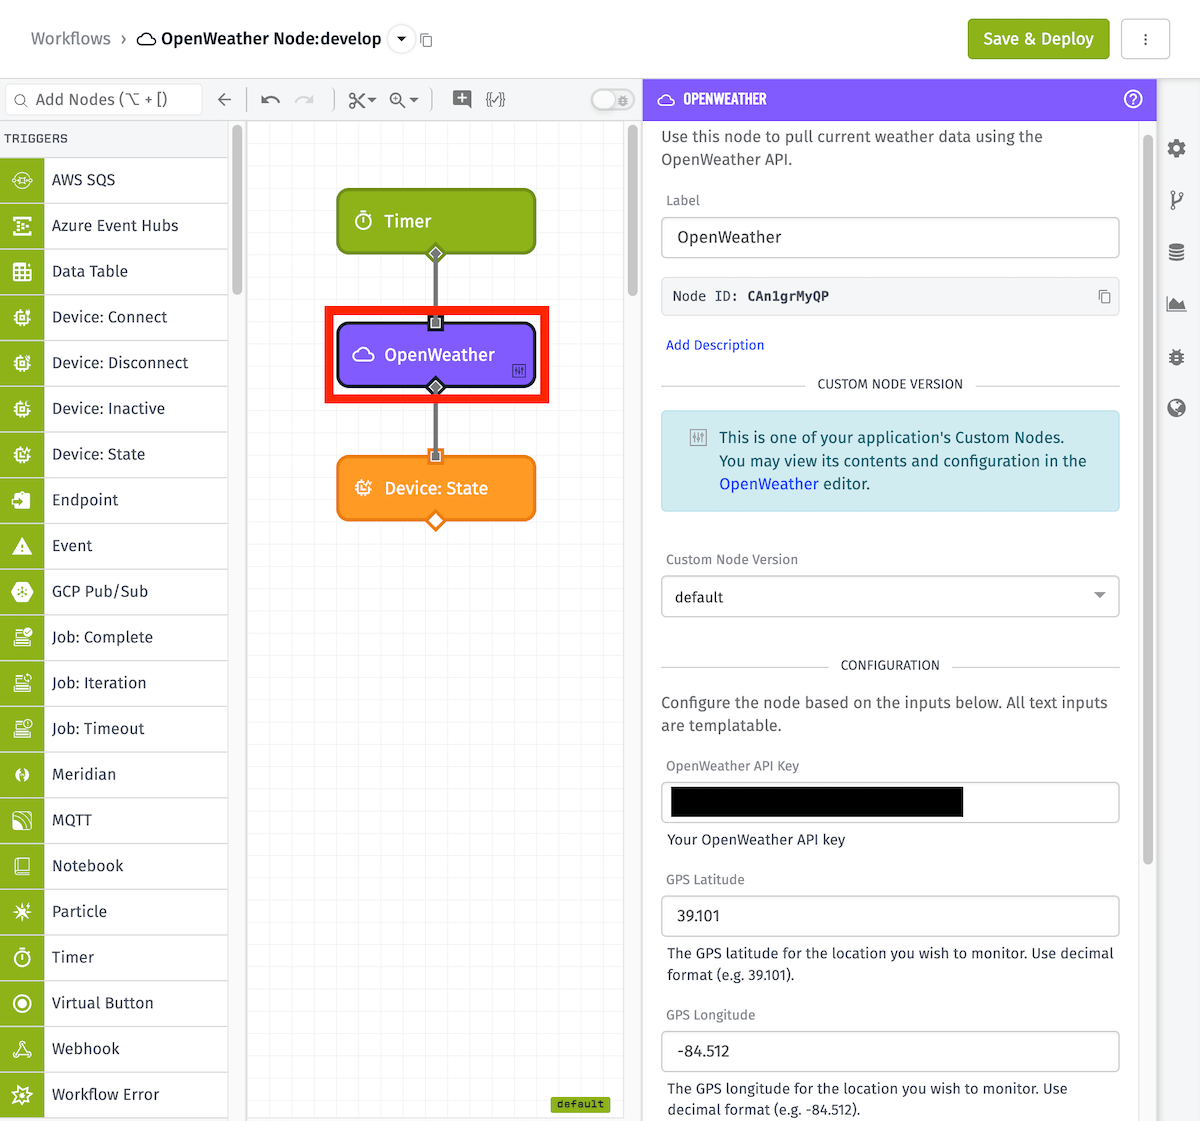
Now that you’ve successfully developed, tested, and versioned your new Custom Node, you can begin using it within your application and experience workflows. The node will immediately show up on the workflow node palette under the category you specified earlier.
- Custom Node Version — As we mentioned in the previous section, if your Custom Node has multiple versions, the user will be able to choose the version from this dropdown menu. The Configuration options available below will update based on the selected version. The default version will be automatically selected.
- Configuration — The input fields we configured earlier are automatically presented to the user so they can provide the required data for your node.
- Result — Since our Custom Node outputs a result, the user will be presented with a
Result Pathfield in which they can specify the payload path to store the node’s result.
Conclusion
Congratulations, you’ve completed the Custom Node Walkthrough! We hope that you’ve found this guide helpful. If you’ve developed a cool Custom Node that you’d like to share with the WEGnology community, or if you’re looking for some help building one, please visit our forums!
Addendum: Improving the OpenWeather Custom Node
In this guide, we created a simple Custom Node that returns current weather information using the OpenWeather API. However, there’s more that can be done to improve this node.
Note: The following sections assume that you’ve followed along with this guide and created a Custom Node as outlined above.
Celsius and Fahrenheit Measurements
The Custom Node we built in this walkthrough returns temperature data in kelvin units, which is the default unit of measurement used by OpenWeather’s API. Depending on the application, this format might be perfectly fine for the user. However, what if we want to give the user the option to return temperature data in Celsius or Fahrenheit?
The OpenWeather API contains a parameter that allows us to do just that. Let’s add an input control that prompts the user to select the desired temperature unit, and then change the URL Template in our HTTP Node to include the relevant parameter.
First, open the Custom Node Inputs tab, just as we did earlier when we added our other input controls. Click the Add Input button and then select the Select option.
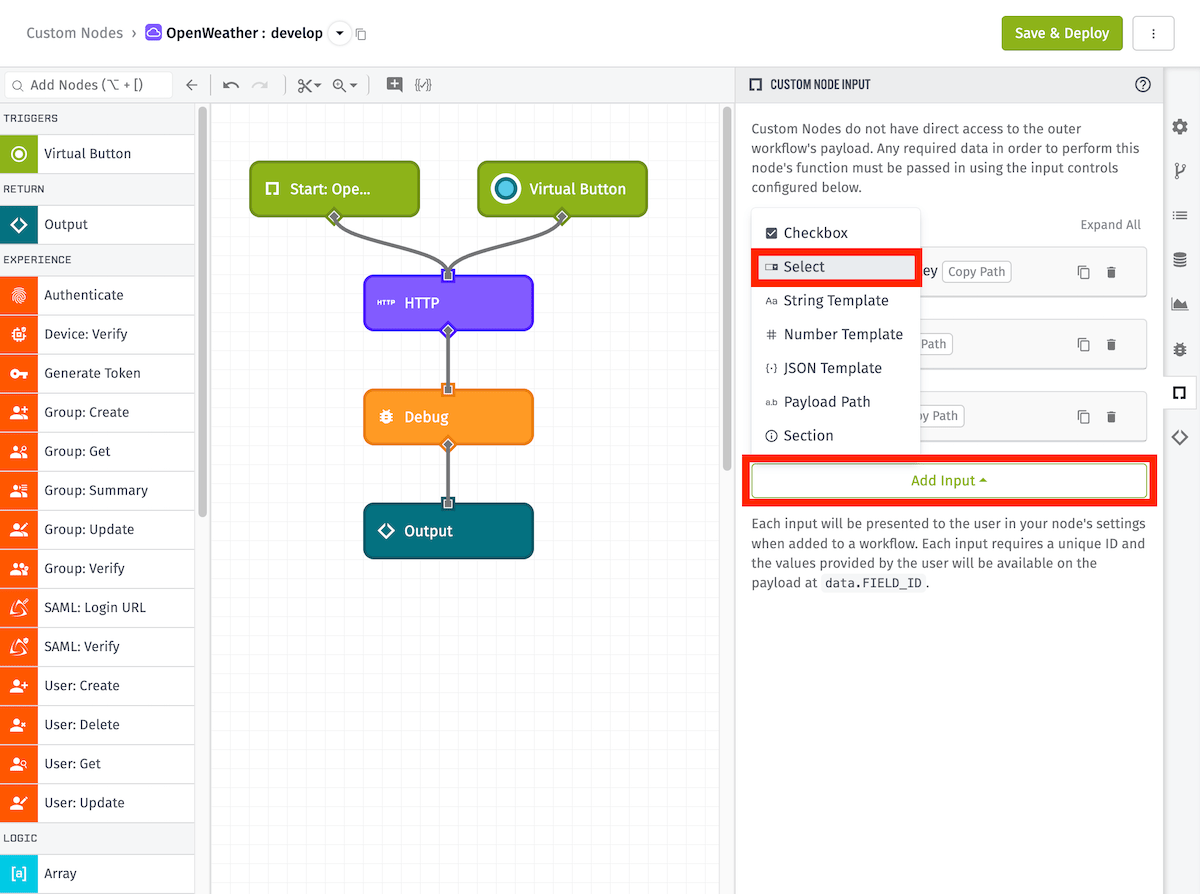
The Select input allows us to define a dropdown menu presented to the user in the node’s configuration panel. The items that we specify here will be the selectable options available on that menu.
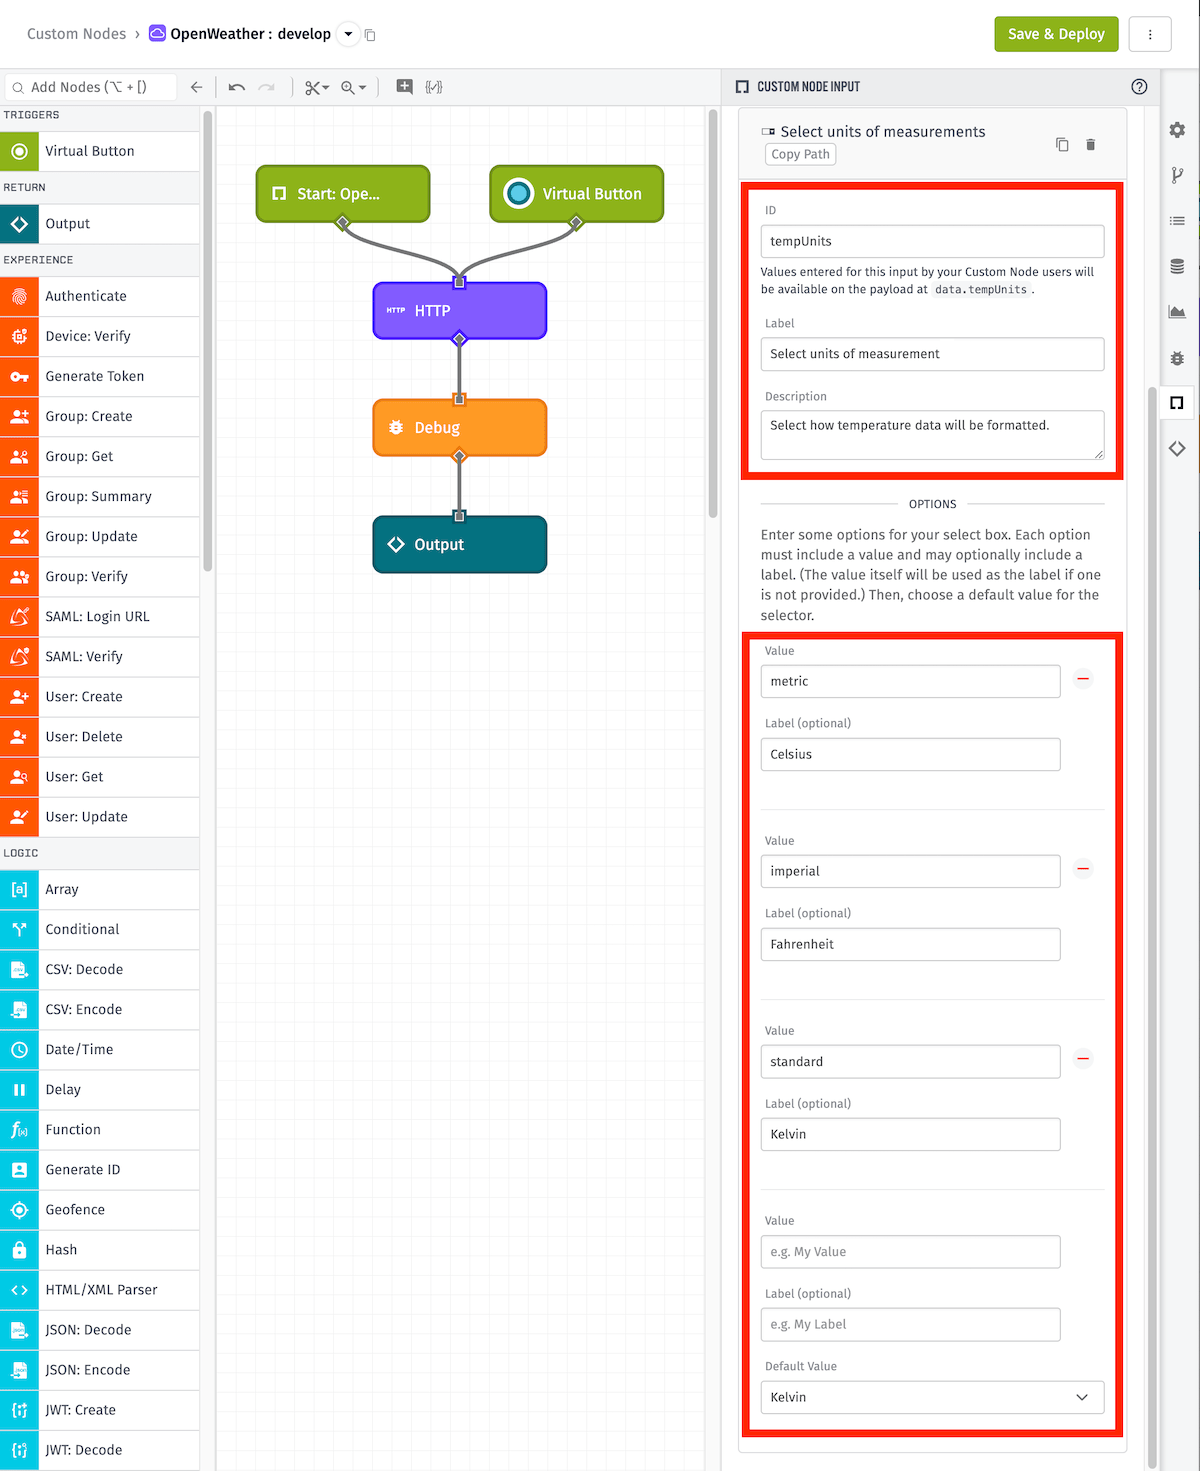
- ID — Enter
tempUnits, which will place the selected option at the payload pathdata.tempUnits. - Label — In this case,
Select units of measurement - Description — This input is fairly self-explanatory, so we’ll use a simple description here.
Under the Options section, we’ll define each selectable option.
Value corresponds to the data that we want to be made available in the data.tempUnits path when the option is selected by the user.
Label is how we want that option to appear in the dropdown menu.
Add the following three options:
- Value —
metric/ Label —Celsius - Value —
imperial/ Label —Fahrenheit - Value —
standard/ Label —Kelvin - Default Value — This will be the option selected by default in the dropdown menu. You can set it to whatever you’d like. We’re using
Kelvinin this example, since this is the default format used by the OpenWeather API.
Next, we’re going to update the HTTP Node we created earlier to accept this new value as an additional parameter.
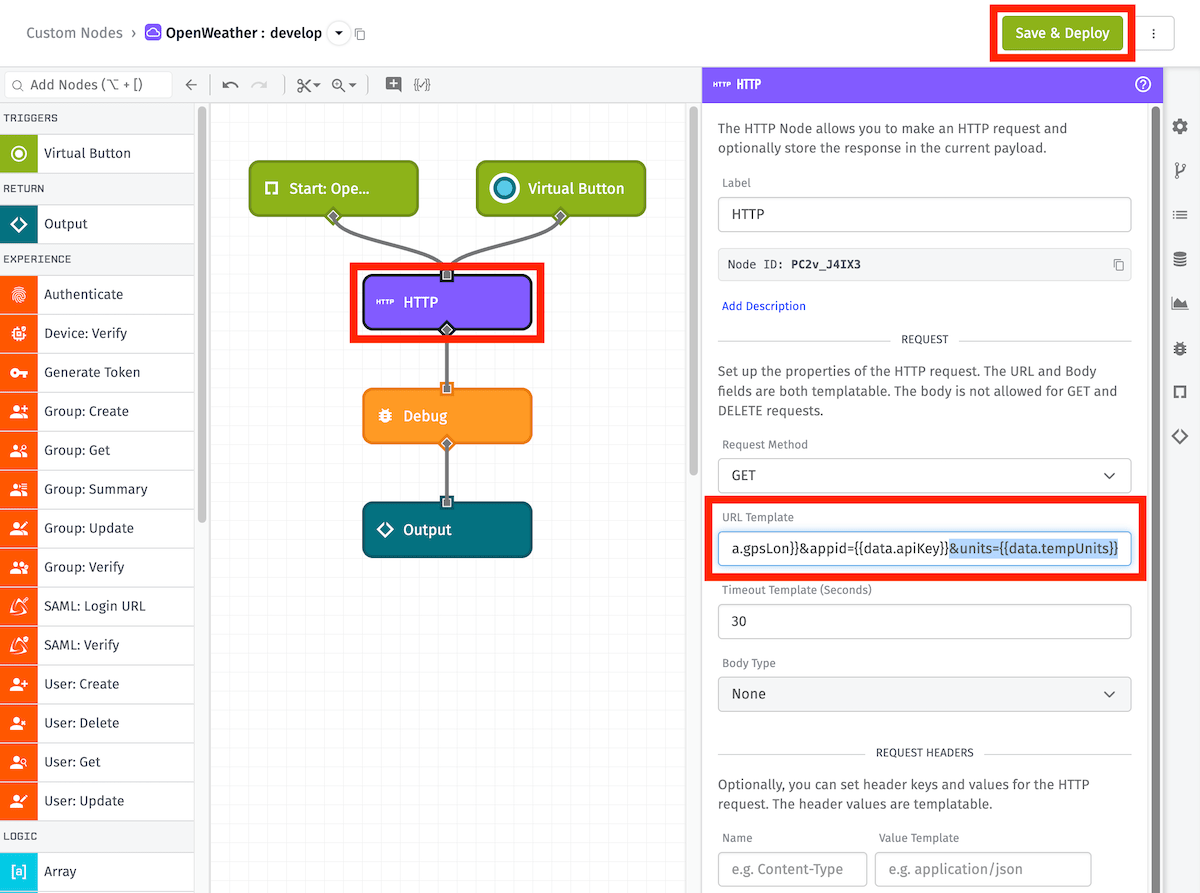
Click on the HTTP Node in your canvas to open its configuration panel. In the URL Template field, add the following to the end of your entry: &units={{data.tempUnits}}
-
The entirety of the URL Template field should now be:
Click Save & Deploy in the top-right.
Note: Remember, this will save to the develop version of your node. You can create a new version and/or change the default version of your node at this time if you’d like.
As always, you’ll want to test the changes made to your Custom Node. Update your Virtual Button Trigger payload to include one of the new values we’ve made available:
{
  "apiKey": "your-api-key",
  "gpsLat": "39.101",
  "gpsLon": "-84.512",
  "tempUnits": "metric"
}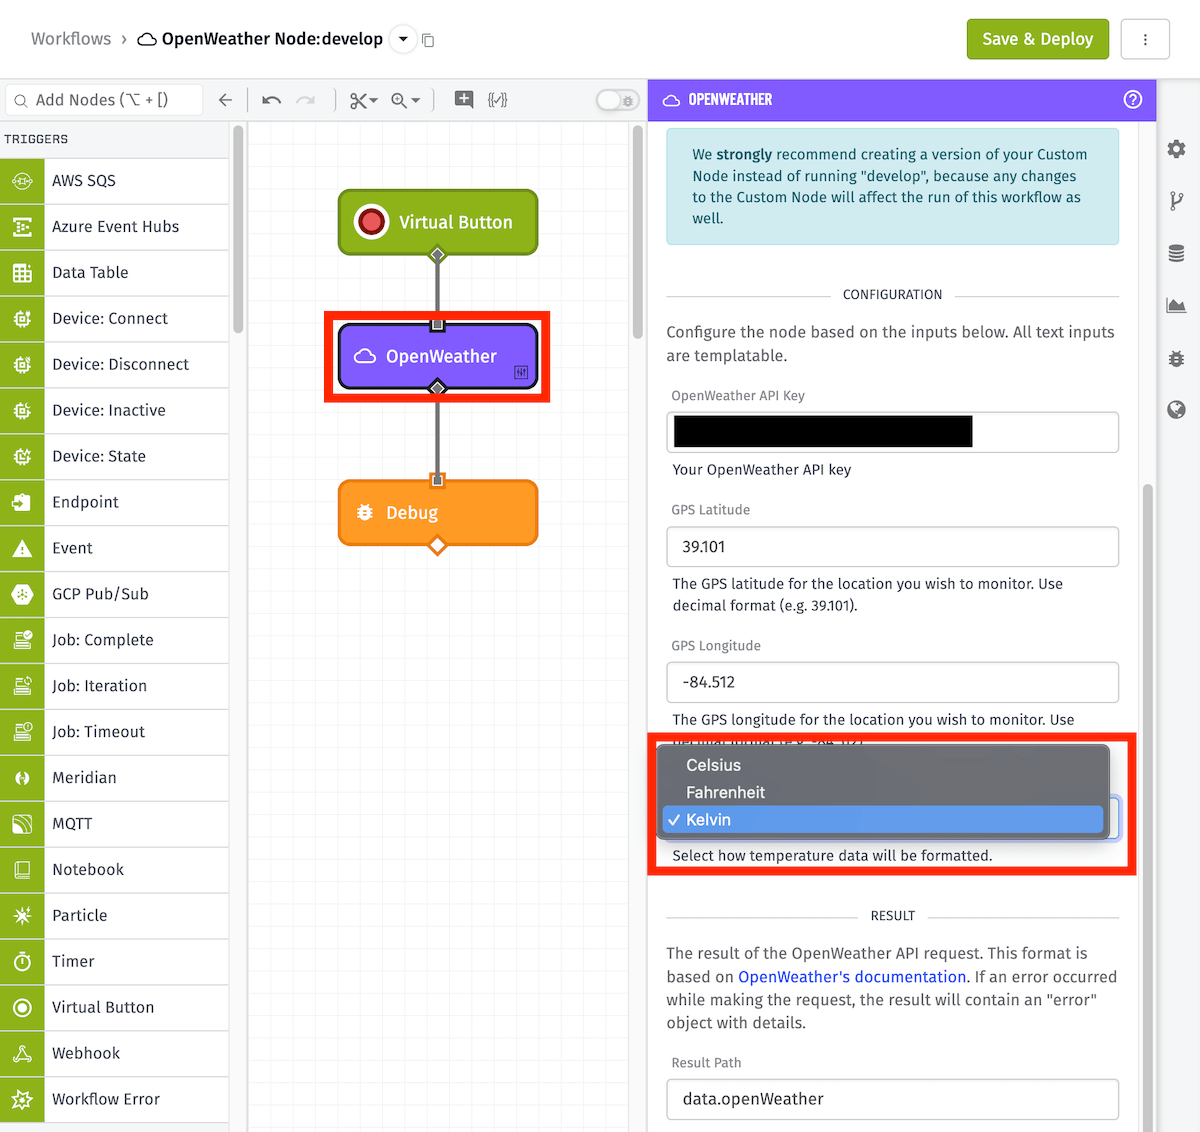
When you return to your workflow canvas and click on your Custom Node, you’ll see the new dropdown menu available under the Configuration section.
Remove Unnecessary Objects From the Payload
When developing a Custom Node, it’s important to consider the format of the payload being returned to the outer workflow. Ideally, the payload will only contain data that is relevant to the intended use of the node.
Below is an example of an API response from our HTTP request, which we’ve stored under working.result:
{
  "working": {
    "result": {
      "body": {
        "base": "stations",
        "clouds": {
          "all": 40
        },
        "cod": 200,
        "coord": {
          "lat": 39.101,
          "lon": -84.512
        },
        "dt": 1676291868,
        "id": 4302529,
        "main": {
          "feels_like": 271.04,
          "humidity": 52,
          "pressure": 1010,
          "temp": 275.23,
          "temp_max": 277.56,
          "temp_min": 272.18
        },
        "name": "Newport",
        "sys": {
          "country": "US",
          "id": 2080075,
          "sunrise": 1676291548,
          "sunset": 1676329935,
          "type": 2
        },
        "timezone": -18000,
        "visibility": 10000,
        "weather": [
          {
            "description": "scattered clouds",
            "icon": "03d",
            "id": 802,
            "main": "Clouds"
          }
        ],
        "wind": {
          "deg": 200,
          "speed": 4.63
        }
      },
      "headers": {
        "access-control-allow-credentials": "true",
        "access-control-allow-methods": "GET, POST",
        "access-control-allow-origin": "*",
        "connection": "close",
        "content-length": "481",
        "content-type": "application/json; charset=utf-8",
        "date": "Mon, 13 Feb 2023 12:37:48 GMT",
        "server": "openresty",
        "x-cache-key": "/data/2.5/weather?lat=39.1&lon=-84.51&units="
      },
      "request": {
        "headers": {
          "User-Agent": "WEGnologyWorkflow/63d2ab17871872f25c08a17f"
        },
        "method": "GET",
        "strictSSL": true,
        "uri": "https://api.openweathermap.org/data/2.5/weather?lat=39.101&lon=-84.512&appid=*****REDACTED*****&units="
      },
      "statusCode": 200
    }
  }
}
Reviewing the payload, we can see that all weather data is stored under working.result.body. The objects under working.result.headers, working.result.request, and working.result.statusCode are unlikely to be useful to the user of this node. Let’s use the Mutate Node to strip those out.
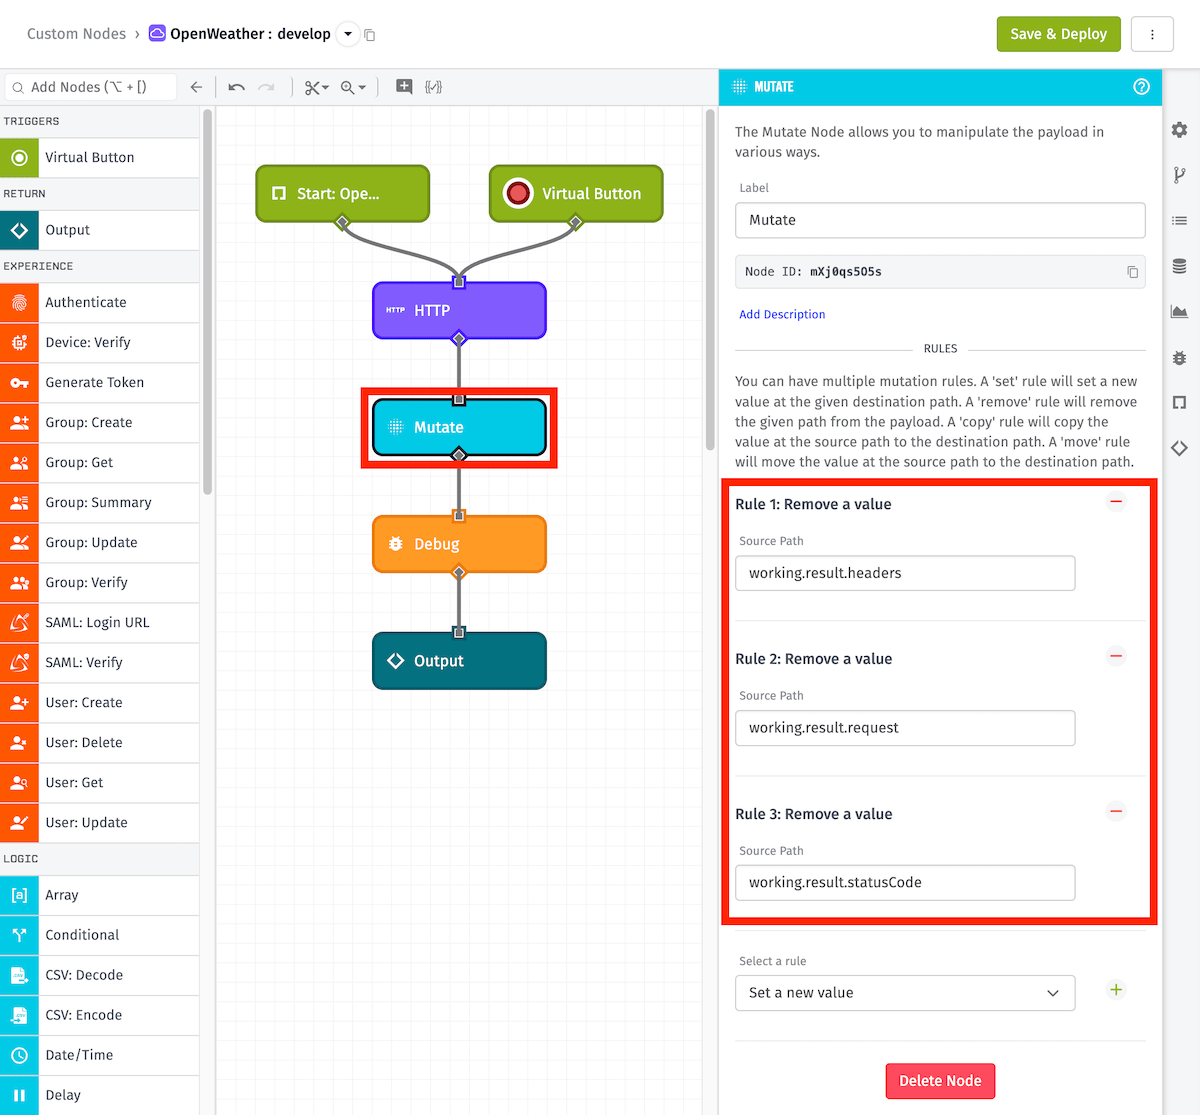
First, add a Mutate Node between the HTTP Node and Debug Node. Under the Select a Rule dropdown menu, select Remove a Value for the following three entries:
working.result.headersworking.result.requestworking.result.statusCode
Click Save & Deploy in the top-right.
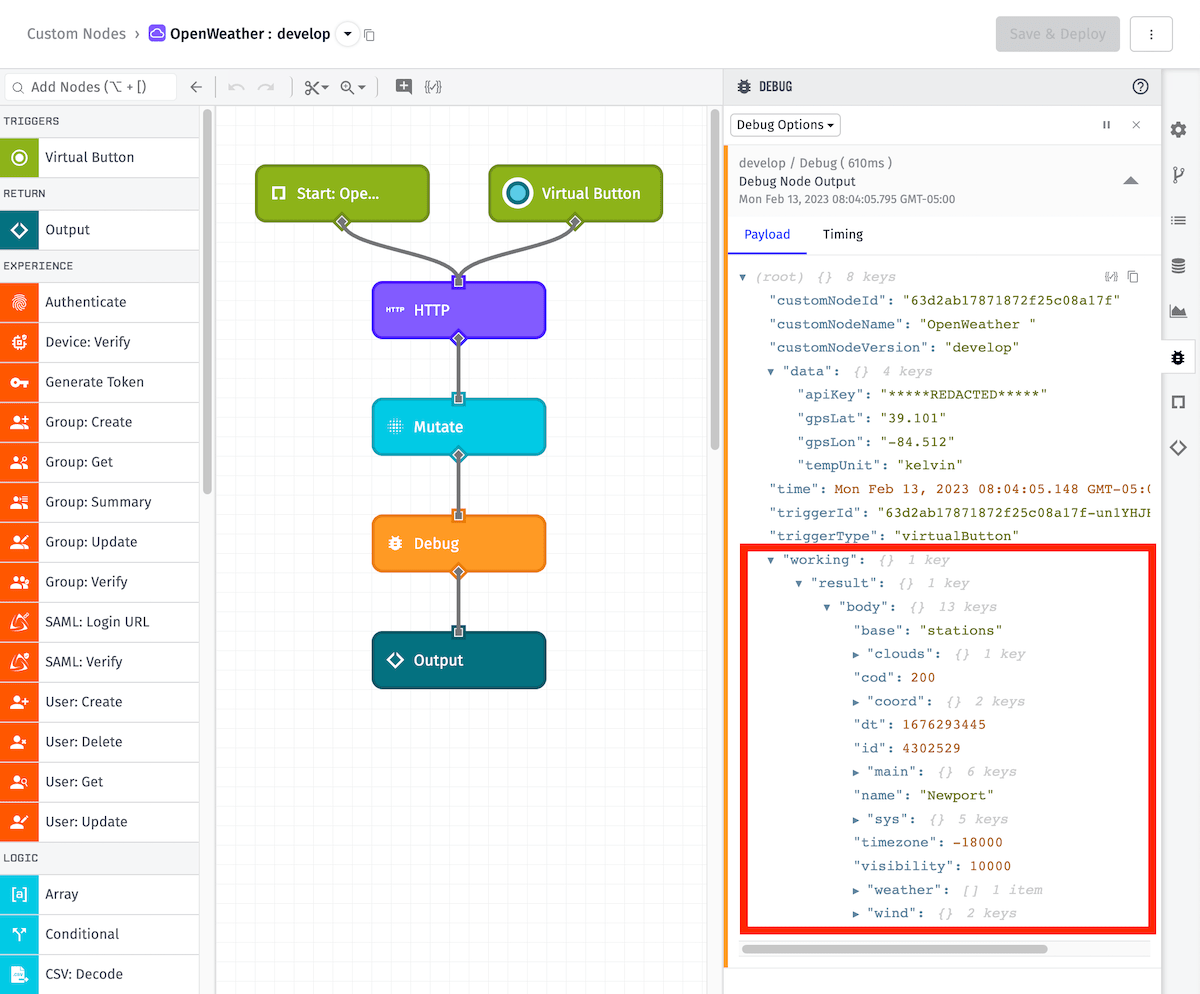
Now, when you test your node, you should see the three objects we specified above removed, with only working.result.body remaining.
Congratulations — you’ve created the perfect OpenWeather Custom Node!
Was this page helpful?
Still looking for help? You can also search the WEGnology Forums or submit your question there.
