Import, Export, and Clone
Applications and their resources can be imported, exported from, or cloned into other Organizations.
Importing and Exporting allows users to share their applications with users outside of their organization easily. All of the export files are human-readable, which makes it easy to use things like Git to independently version control your WEGnology Applications.
You can:
- Create a new application from an import
- Import into an existing application
- Export an existing application
- Clone an existing application
Importing An Application
You can import a previously exported application by using the "Import" button on your Organization overview page and uploading the export zip.

If the application is small, you'll be immediately redirected to the new application's overview page. If the application is large, you'll receive an email when the import is complete.
Resource IDs
Since IDs within WEGnology are globally unique, all resources in an imported application will have different IDs than the original application. The import process will take care of re-creating any relationships between resources using their newly generated ID.
Disabled Resources
Application Workflows and Integrations are automatically disabled for imported applications. This is to ensure unexpected logic is not executed until you're ready.
Integrations can be enabled on the specific properties page for each integration. You can quickly enable all workflows on the workflows overview page:

Application Import Throttling
Only one import per owner (i.e. per personal Sandbox or per organization) may be in progress at a time. If additional import requests are received while there is one in progress, a 429 status code is returned and the request must be made again after the in-progress request completes.
Import Into an Existing Application
Resources can also be imported into an existing application from a few different sources. Doing so allows for the sharing of proofs of concept and custom user templates, and the process also enables the management of an IoT application development lifecycle.
Import Request Settings
When importing an export bundle into an existing application, there are a few properties to set for the import request.
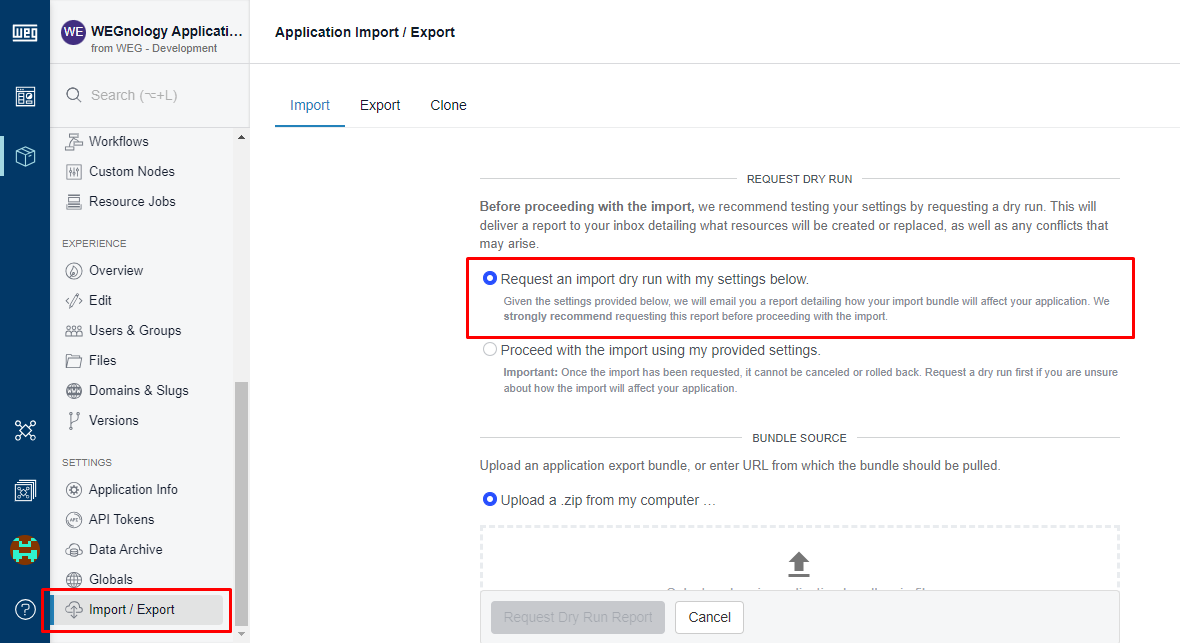
Request Dry Run
We recommend testing your import request first with a "dry run" before proceeding with the import. To do so, configure your request settings as described below, then click the "Request Dry Run Report" button. The result CSV, as well as any errors that would prevent an actual import, will then appear in the import request log and be delivered to your email and/or callback URL when the check is complete. (Depending on the size of the import source, this can take anywhere from a few seconds to several minutes.)
The CSV lists which resources from the bundle will be created and for each resource, details whether the resource conflicts with an existing resource in the existing application. In the case of a conflict, the ID of the existing resource is listed as well as the anticipated result based on the selected conflict behavior.
If the selected conflict behavior is either "Replace" or "Retain", and an existing application resource does conflict with an imported resource, and the existing resource has an export hash from a previous import that matches the export hash for the resource to be imported, then that indicates the configuration of the two resources is exactly the same and the import will have no impact on that particular resource.
The dry run CSV headers include the following:
- resourceType: The type of resource to import.
- resourceFingerprintFormat: The string format of the fingerprint used to find existing resource conflicts.
- importingResourceFingerprint: The fingerprint based on the YAML, and built with the fields shown in the fingerprint format. This fingerprint is unique per resource type.
- importingResourceId: The ID from the YAML file.
- existingResourceId: A matching existing resource ID from the importing application.
- importResult: The resulting import behavior at the time of import (
create,error,retain,replace,no change) based on the selected conflict behavior and the results of the conflicts. For example, if the import is including Experience Views and the selected conflict behavior isreplace, if a view with the same fingerprint is not found within the application, the result will becreate. - importResultComments: This field includes extra information about the resources at the time of import. If the import result is
error, then this field can include the error message. For Data Tables, if the import is including data table rows, there will be some information on how many rows will be created, updated, conflict or error. For any non-develop-version experience resources (Experience Endpoints, Experience Views, and Experience Workflows), this field will contain information as to how these resources are created.
Import Source
The import source can be provided one of several ways:
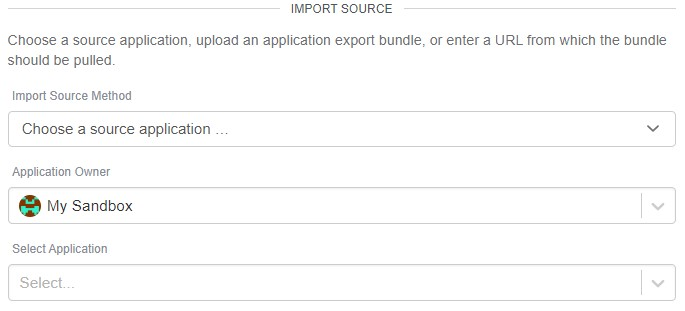
- Choose a source application ...: Choose another application from which to import its resources into this application. If selected, you must provide ...
- Application Owner: The organization (or sandbox) that owns the application you would like to import resources from.
- Select Application: The application from which to import resources. You must have at least collaborate permissions permissions in that application.
- Upload a .zip from my computer ...: Select this option to upload a previously generated export bundle (up to 10MB) from your local file system. If selected, you must provide a valid application export zip file.
- Import from a URL ...: Provide a public URL to an export bundle. For example, if you wish to import .zip file larger than 10MB, you may upload the file to Application Files and then provide its URL through this method. If selected, you must provide a Bundle URL. The maximum size of the unzipped file contents is 1GB.
- Pull from a Git repository ...: Import resources from a Git repository that application resources have previously been pushed to. The repository structure must mirror the output of an application export. If selected, you must provide ...
- Credential: Select one of your application's Git service credentials for authenticating the import request.
- Branch Name: Optionally, provide a branch name from which to pull the resources. If not provided, this defaults to the repository's default branch.
- Directory in Repository: Optionally, provide a directory within the repository from which to pull resources. This defaults to the root of the repository if not provided.
Resource Selection
By default all resources from the source are uploaded. Optionally you may choose to import only specified resource types.
There are some potential ramifications and errors to consider if you choose to import only specified resources.
- If imported resources reference other resources that are not imported (are missing from the import source) and do not match against an existing resource by fingerprint, there is a high likelihood that the import will error. For example, if device recipes are uploaded and one or more recipes reference a parent device, but devices are not uploaded, a validation error is thrown.
- For versioned experience resources, only the "develop" version of specified resources are imported when the resources are explicitly selected.
- To import all versions of experience resources other than those from the "develop" version, you must select
Experience Versions. This will import all resources from all other versions, as well as each version's configuration settings. Note: WEGnology recommends only importing the "develop" version and then creating a new experience version to serve to your users after thorough testing. Overwriting of experience versions could lead to unintended consequences without being verified first.

Conflict Behavior
Conflict behavior describes what should happen in the case of conflicting resources during the import process. There are four available conflict behaviors:
- Keep both resources whenever possible: (Default) The import process attempts to keep both the existing resource and the resource from the bundle.
- Overwrite the existing resource with the imported resource: The import process replaces existing resources with resources from the bundle in the case of a conflict.
- Keep the existing resource and ignore the imported resource: The import process retains the existing resources and ignores conflicting resources in the import bundle.
- Error the import request if any resources conflict: The import process errors and no resources from the import bundle are added to the application.
How Are Conflicts Determined?
The exact parameters that determine a conflict for the import process vary by resource type. Resources match by their "name" property unless otherwise noted below.
- Devices: Name and device class
- Integrations: Name and integration type
- Non-Experience Workflows: Name and flow class
- Non-Experience Workflow Versions: Name, flow class, and version
- Experience Workflows: Name, flow class, and version (develop only, see below note for versioned experience workflows)
- Experience Endpoints: Method, route, and version (develop only, see below note for versioned experience workflows)
- Experience Views: Name, type, and version (develop only, see below note for versioned experience workflows)
- Experience Versions: Version name
- Experience Users: Email address
- Experience Groups: Name and parent group
- Files: Name, directory, and public vs. private file
- Application Globals: Key
- Data Table Rows: Data table ID and row ID
Note for conflicting experience versions: If an experience version in an import bundle conflicts with an existing experience version, all of the resources within the version will follow the selected conflict behavior. If keeping existing resources, no resources of that version from the bundle will be imported. If overwriting existing resources, all existing resources will be removed and the resources from the bundle will be imported. The exception to this is for resources in the "develop" version, which conflict according to the above rules.
Note that these conflicts do not always align with what is strictly allowed in applications. For example, it is possible within an application to make two devices with the same name and the same class without issue and this is considered a conflict when a bundle is imported. Additionally, if a resource from the import bundle conflicts with multiple existing resources, the import will error (unless keeping both resources).
Notifications
Finally, provide either or both of the following ...
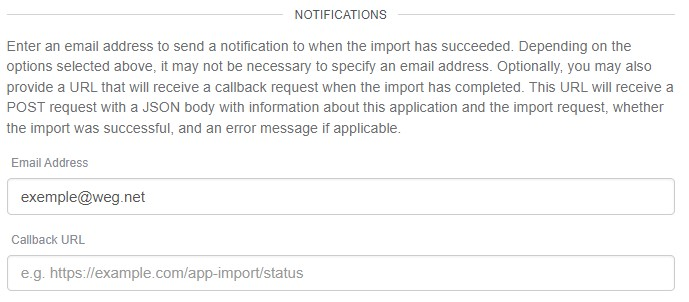
- Email Address: The result of the operation - a dry run report or an import request - will be provided to the address provided once it is completed. This value defaults to the address of the user making the import request.
- Callback URL: On completion, a POST request will be made to the provided URL. A link to the dry run report (if applicable) and other information relevant to the request will be available in the request body. The URL must be publicly available (such as a WEGnology webhook).
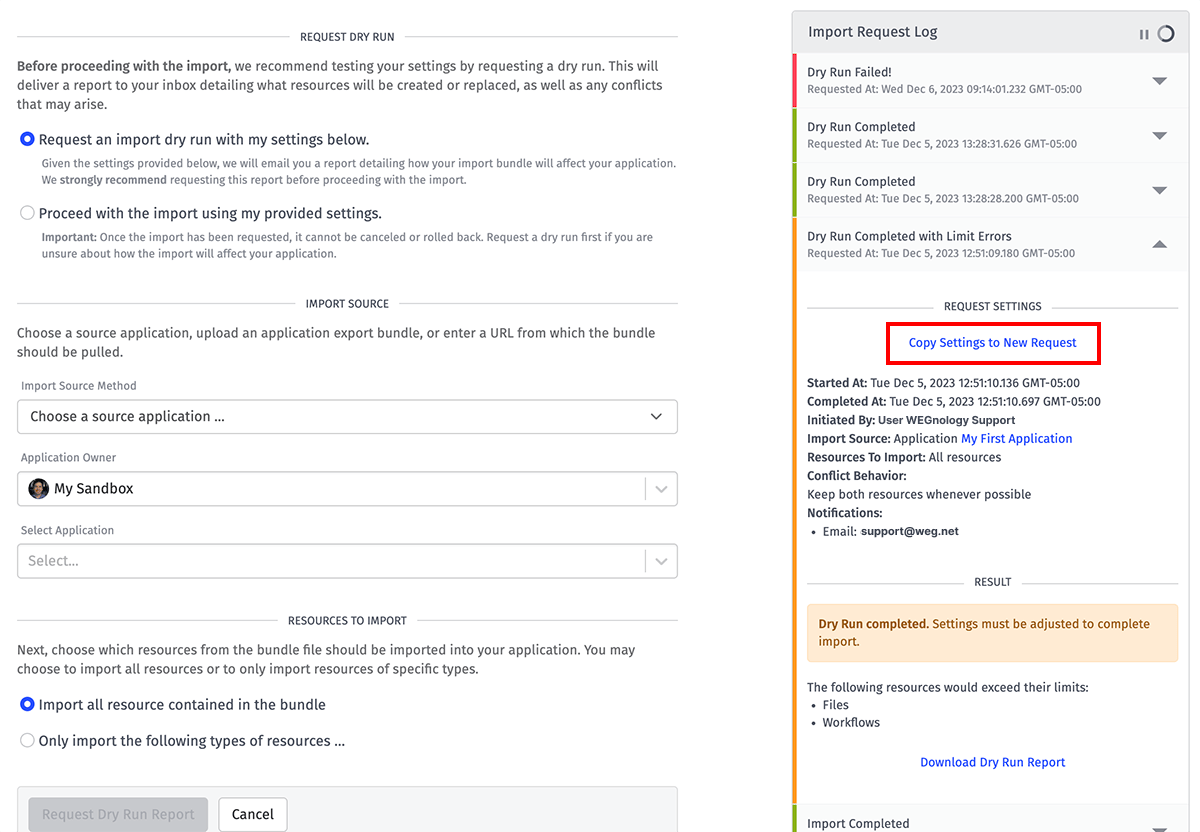
Import Request Log
A log of recent import requests is also available on the import request form. Each log item includes settings from the request, including:
- Who made the request and when.
- Settings applied to the request, including the bundle source, conflict behavior, selected resource types, and notifications.
- Whether the request succeeded, and why it failed if so.
- A link to the dry run report, if applicable and still available. (The report is no longer available 7 days after completion.)
From the log, any previous request's settings can be copied to a new import request. Doing so will overwrite the import form's settings with the settings applied to the selected log item, after which you may review the settings, make any adjustments, and submit a new request.
There are a few caveats to consider:
- If copying a request that used another application as the import source, the selected application will not be applied to the new request if the user does not have collaborator permissions for that application.
- Requests that use a .zip file as the import source will provide the bundle as an import URL for a new request, but only if ...
- The user who made the original import request is setting up the new request, and
- A link to the originally uploaded file is still available, which it will only be for 7 days after the request was made.
- Requests that use an import URL as the source will only copy the URL to the new request if the user who made the original import request is setting up the new request.
- The email address from a previous request will never replace the value of the "Email Address" field in the form, which defaults to the address of the current user.
Existing Application Import Throttling
Only one application import resource request may be in progress at a time. If additional application import resources requests are received while there is one in progress, a 429 status code is returned and the request must be made again after the in-progress request completes.
Exporting An Application
Exporting can be found under the "Export" tab under the "Import / Export" navigation. You can only export an application if you are an Administrator for that application.

Export Request Settings
Requesting an application export is broken up into the following sections ...
Export Destination
Choose how to deliver the application configuration files generated by the export request ...
- Zip file delivered to email / callback URL: Select this option to deliver a signed URL for downloading a zip file containing the exported application configuration. This is the default selection.
- Commit to Git repository ...: If selected, the resources will be pushed to a Git repository of your choosing. You must provide the following ...
- Credential: Choose one of your application's Git service credentials, which includes the repository to which to commit the resources. If the selected credential includes a Committer Name and/or Committer Email, these will be associated with the export commit.
- Branch Name: Optionally, provide a branch name to which to push the resources. If not provided, this defaults to the repository's default branch.
- Directory in Repository: Optionally, provide a directory within the repository to where the resources should be pushed. This defaults to the root of the repository if not provided.
- Commit Message: Optionally, provide a message to include with the Git commit of the resources to your chosen repository.
Selected Resources
Most application resources are automatically included in the export file. When requesting an export, you may choose whether to include the following resources ...
- Devices: Selecting this option will include all of your device configuration in the export. This does not include any device data nor any access keys tied to your devices.
- Data Table Rows: Selecting this option will include all of the rows stored within your Data Tables in the export. If unchecked, your export will still include all of your tables and their column configurations, but with no content in the tables.
- Public Files: Selecting this option will include all of your public files in the export. If unchecked, any references to your files (such as within experience views) will no longer work.
- Private Files: Selecting this option will include all of your private files in the export. If unchecked, any references to your files (such as within experience views) will no longer work.
Export Result
Exporting an application takes time. When making the request, you must provide either or both of the following:
- Email Address: An address for where the result of the export request should be sent, including a link to download the zip file (if applicable). This defaults to the address of the user making the request.
- Callback URL: A public URL - such as a WEGnology webhook - to issue a POST request to with the result of the request.
If exporting to a zip file, the link provided in the email and/or callback body expires after 7 days.
Resources That Will Never Be Exported
The following application resources and data are never included in an application export:
- Access keys
- API tokens
- Events
- Device state data, command history, and connection history
- Experience domains and slugs
- Edge and embedded workflow deployments
- Job execution history (application imports, notebook executions, resource jobs)
- Service credentials
- Workflow storage values and execution metrics
Export Throttling
Only one export of a given application may be in progress at a time. If additional export requests are received while there is one in progress, a 429 status code is returned and the request must be made again after the in-progress request completes.
Export Files Format
The export result files are human-readable in YAML format, which makes it easy to independently version control your WEGnology applications.

Editing the Export Result
You can also directly edit these files if you’d like to make changes manually. A common edit may be to replace actual devices and users with an example set, which can make imported applications a little cleaner.
All exported YAML files, except file resources, will always have two keys resourceType and resources. If you do not have any resources of a specific type, that file will not be exported. If there are multiple files for a specific resource type, there will also be a top-level field called sequenceNumber, which controls the order of importing those files (and the resources in those files).
All IDs are replaced with placeholder IDs, that will be in the format of ~wnology-<resourceModelName>-<resourceName>-<number>~.
Single File Resources
The following are resources that typically come in a single file, and by default the file name is the name of the resource type (e.g. device recipes will be in the deviceRecipes.yaml file). If there are a large number of resources of a particular type, those resources may be split across multiple files.
Application Meta File
application.yaml - The resource type for this file is Application. The application meta file is special in that it is the only resource that can have only one resource in its resources list. It is also the only file required to exist for the zip to be importable.
This metafile will have a special field on it called filesPath. It is the relative path to the root directory for file resources. By default, this field will be ./files. If this field is removed, then files will not be imported.
Application Readme
README.md - This is a Markdown file containing the Application Readme.
Device Recipes Export
deviceRecipes.yaml - The resource type for this file is DeviceRecipe.
Integrations Export
integrations.yaml - The resource type for this file is Integration.
Resource Jobs Export
resourceJobs.yaml - The resource type for this file is ResourceJob.
Webhooks Export
webhooks.yaml - The resource type for this file is Webhook.
Multiple File Resources
The following are resources that will be exported to multiple files for legibility because their metadata can be very large. The directory will be named after the resource type, and each metadata file will be named after the resource's name.
If you combined these files into one giant file with the list of resources (ordered correctly), they would still import correctly.
Dashboards Export
dashboards - The resource type in each of these files is Dashboard.
Devices Export
devices - The resource type in each of these files is DeviceTree.
Experience Users Export
experienceUsers - The resource type in each of these files is ExperienceUser, and they will be named based on the user's email address.
Experience Groups Export
experienceGroups - The resource type in each of these files is ExperienceGroupTree.
Workflows Export
workflows - The resource type in each of these files is Flow. This will not include experience workflows.
Workflow Versions Export
workflowVersions - The resource type in each of these files is FlowVersion. These will not include experience workflow versions.
File Resources with Metafiles
The following are resources that will be inside a directory with a metafile. These files have a special field called localFilename, which will point the metafile to the local resource.
Each of these will be placed in a directory named by the resource type. Inside the resource type directory, each file will be named by the name of the resource.
Data Tables Export
dataTables - The resource type for these metafiles is DataTable. The data tables are optionally exported with their CSV of data.
Notebooks Export
notebooks - The resource type for these metafiles is Notebook. The notebook executable will be included in the export.
Files Export Result
Exported public and private files are special in that they do not contain any metafiles.
By default, they will be placed under directories named files (for public files) privateFiles (for private files) and the application metafile will contain fields called filesPath and privateFilesPath respectively. These fields tell the import where to look for the file resources, if any. If the fields are not present or are left blank, those respective directories will not be imported.
The resources inside of the files and privateFiles directories will reflect the same paths as seen in the WEGnology Files UI. Empty directories will not be included in the export.
Versioned Experience Resources
All versioned experience resources will be placed in the directory called experience. All directories inside of the experience directory are named by the experience version name e.g. /export-application/experience/develop. Inside of each of those directories will be the following resources ...
Experience Endpoints
endpoints.yaml - This single file of all the endpoints for this particular version. The resource type is ExperienceEndpoint.
Experience Version
version.yaml - This is the meta data about the specific version. The resource type is ExperienceVersion.
Experience Layouts
layouts - This is a directory that will have a layouts.yaml metafile and each layout will have a handlebars file named by the name of the layout. In the layouts.yaml file, each resource will have a localFilename field, connecting the handlebars template to the layout meta data. The resource type for these files is ExperienceView.
Experience Pages
pages - This is a directory that will have a pages.yaml metafile and each page will have a handlebars file. In the pages.yaml file, each resource will have a localFilename field connecting the handlebars template to the page meta data. The resource type for these files is ExperienceView.
Experience Components
components - This is a directory that will have a components.yaml metafile and each page will have a handlebars file named by the name of the component. In the components.yaml file, each resource will have a localFilename field, connecting the handlebars template to the component meta data. The resource type for these files is ExperienceView.
Experience Workflows
workflows - This is a directory of all your Experience Workflows. Inside this directory will be a file for each workflow that is associated with this Experience Version. Each file will be named by the workflow name. The storage type for these files is ExperienceFlowVersion.
Cloning an Application
If you want to make a near-identical copy of an application, you can clone it. To do so:
- Open the Import / Export screen.
- Select Clone.
- Choose an owner of the application from one of the available options in the drop-down menu. By default this is the organization or Sandbox that currently owns the source application, but this can be changed to any other organization where you have administrator access (or your own Sandbox).
- Optional. Choose whether to clone the following by selecting the checkbox:
- Clone devices: Copies all of your device metadata to the new application. Does not include any device data or access keys tied to your devices.
- Clone data (rows) within data tables: Copies all the data stored within your data tables. If unchecked, your new application will still include all of your tables and column configurations.
- Clone public application files: Copies all of your public files to the new application. If unchecked, links to your public files will stop working.
- Clone private application files: Copies all of your private files to the new application. If unchecked, links to your private files will stop working.
- Click Clone Application.

Cloned applications are still subject to account resource limits, and you are unable to clone an application if the result of the operation causes any of your resources to go over their allowed limits.
The following will not be cloned into the new application:
- Access Keys
- API Tokens
- Events
- Device state data, command history, and connection history
- Experience Domains and Slugs
- Edge and Embedded Workflow deployments
- Job execution history (for Notebooks, Resource Jobs, and application imports)
- Service Credentials
- Workflow storage values and execution metrics
The following will be cloned but in a disabled state:
All other application resources, archive configuration settings, and global values are cloned into the new application.
Depending on the size of your cloned application, it may take some time for the process to complete, in which case you will receive an email at the address of your choosing, configured in the dialog, when your new application is ready.
Clone Throttling
Only one application clone request for a given owner (i.e. per personal Sandbox or per organization) may be in progress at a time. If additional clone requests are received while there is one in progress, a 429 status code is returned and the request must be made again after the in-progress request completes.
Troubleshooting
Here are some common problems that may occur:
Opening Zip Files
If you are using a Windows computer, and you are having trouble unzipping an export, it could be due to your Application File path names.
The Windows OS will only allow 250 characters for the entire path inside the zip file. You may have to use a more powerful zip library such as UnZip.
Was this page helpful?
Still looking for help? You can also search the WEGnology Forums or submit your question there.