Building Performant Workflows
Every technology has best practices. In this guide, we’ll address some common issues that impact workflow performance, as well as some tips that can make your workflows more efficient.
Before we begin, a few disclaimers:
- You’ll see many of the examples in this guide reference the workflow debug timing tab, one of the primary tools for measuring workflow performance. We encourage you to review this feature if you aren’t familiar.
- Additionally, many of our examples utilize the Virtual Button Trigger and the Debug Node, both of which are very helpful for testing.
- As always, test diligently before committing any of the recommendations shown here to production workflows. We highly recommend the use of workflow versioning.
Function Node Usage
The Function Node allows the execution of arbitrary, user-defined JavaScript code. WEGnology users well-versed in JavaScript should be very comfortable using this node in a wide variety of cases. It can be a powerful tool, but it should be used sparingly.
This is largely due to the containerized nature of the Function Node. For security purposes, the user’s code runs in a discrete sandbox and is validated before being allowed to enter the workflow. This imparts a fixed time cost every time a Function Node is used, even though the code itself is executed quickly.
In addition, there is a limit to how many Function Nodes can run simultaneously on a single application. Overuse of these nodes in one or more workflows can cause application-wide performance issues, although this is a rare occurrence.
For these reasons, minimizing the frequency of Function Nodes increases efficiency, and if you have multiple Function Nodes in a workflow, you should attempt to combine them. Similarly, Function Nodes should not be used in loops, whenever possible.
We’ve constructed a series of tests to demonstrate the performance advantages and disadvantages associated with the Function Node. In each of the three examples shown below, we’re executing the following tasks:
-
Run 1,000 iterations. For each iteration:
- Generate three random numbers between (index * -10) and (index * 10).
- Push all three numbers to an in-iteration array.
- Return that array for the result of the iteration.
- Flatten the resulting array of arrays into one flat array.
- Sort the values in ascending order.
Function Node Within a Loop
In this first demonstration, we’ve placed a Function Node within a loop to accomplish the test scenario described above. This means the Function Node container is being constructed and deconstructed 1000 times.
const getRandomInteger = (min, max) => Math.floor(Math.random() * (max - min + 1) + min);

payload.randomX = getRandomInteger(payload.currentItem.index * -10, payload.currentItem.index * 10);
payload.randomY = getRandomInteger(payload.currentItem.index * -10, payload.currentItem.index * 10);
payload.randomZ = getRandomInteger(payload.currentItem.index * -10, payload.currentItem.index * 10);

payload.myArray = [];
payload.myArray.push(payload.randomX);
payload.myArray.push(payload.randomY);
payload.myArray.push(payload.randomZ);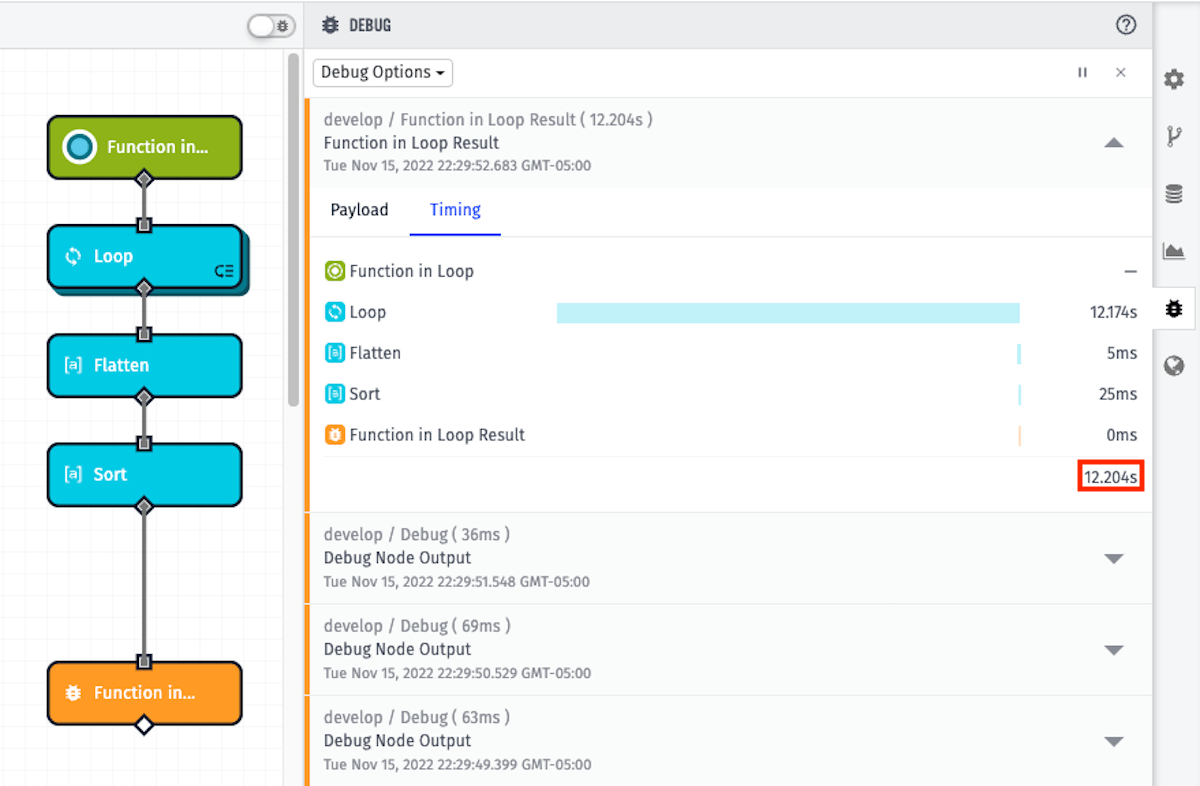
12.204s is the completion time.
Single Function Node
For the next test, we’re going to complete the same tasks listed above, but rather than looping through a Function Node 1000 times, we’re going to execute everything in just one Function Node.
const getRandomInteger = (min, max) => Math.floor(Math.random() * (max - min + 1) + min);

payload.result = [];

for (let i = 0; i < 1000; i++) {

    const randomX = getRandomInteger(i * -10, i * 10);
    const randomY = getRandomInteger(i * -10, i * 10);
    const randomZ = getRandomInteger(i * -10, i * 10);

    const myArray = [];
    myArray.push(randomX);
    myArray.push(randomY);
    myArray.push(randomZ);

    payload.result.push(myArray);
}

payload.result = payload.result.flat();

payload.result.sort((a, b) => a - b);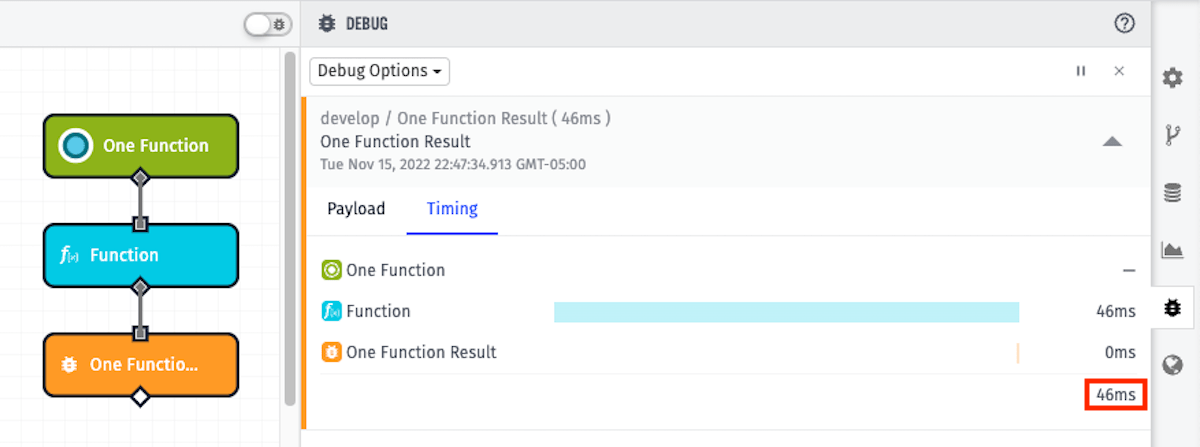
46ms is the completion time, which is significantly less than when the Function Node was placed in a loop in the first example. This is because the construction and deconstruction of the Function Node’s container only occurred once - not 1000 times.
Single Native Node vs. Single Function Node
In the above examples, we determined for that particular set of tasks, a single Function Node provided the best performance. However, let’s take a look at another task:
- Fetch 1,000 devices.
- Group the array by the value of the given tag key, comparing the Array Node’s “Group By” method to using a Function Node.
Since the native node doesn’t have to construct and deconstruct a container to operate within, we will see that native nodes oftentimes outperform Function Nodes when given an equivalent task.
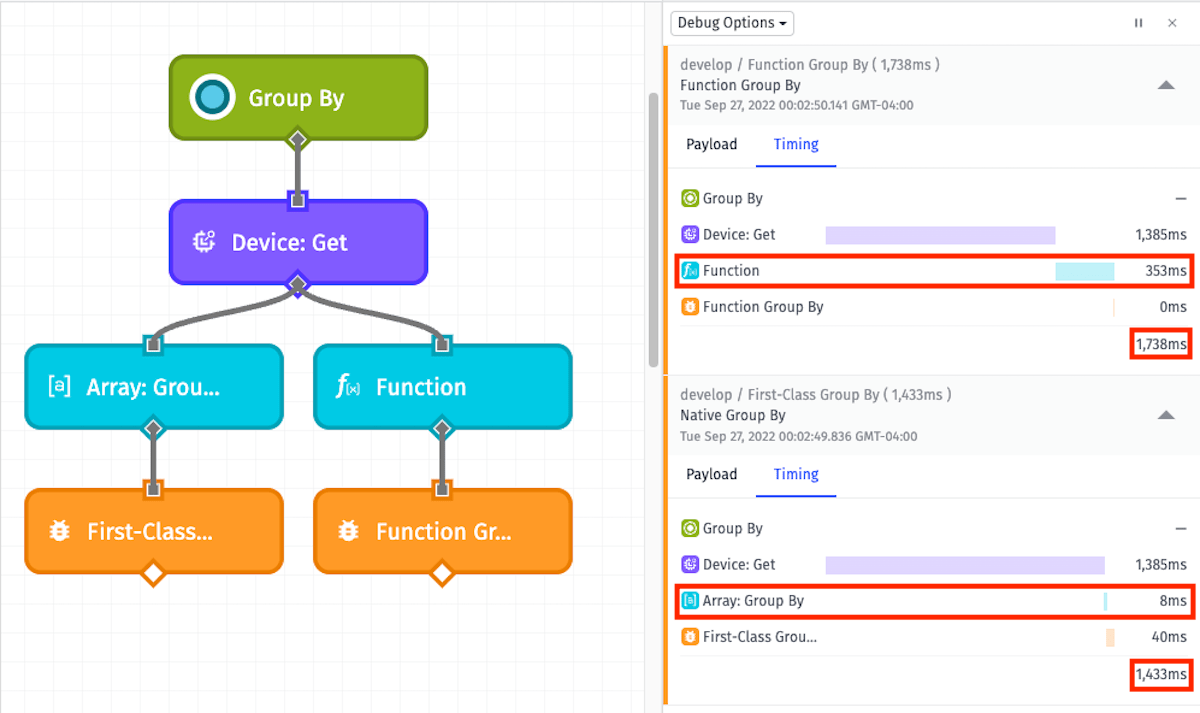
The important takeaway from the example above is the difference between the Function Node execution time (353ms) and the Array: Group By Node (8ms).
Loop Nodes: Serial vs. Parallel
The Loop Node allows for iterating over values on your payload, or for performing a certain operation a set number of times. When configuring a Loop Node, you must specify whether the loop should run in Serial Mode or Parallel Mode.
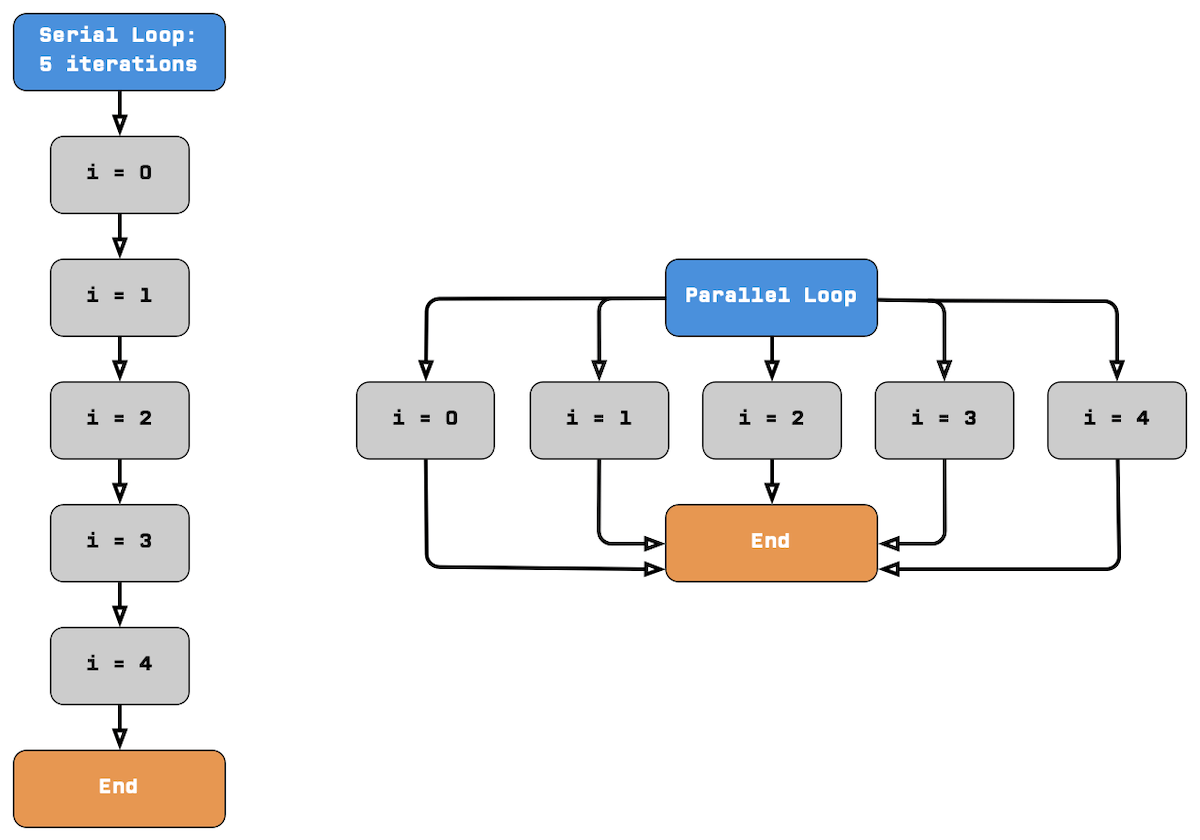
Serial loops run one iteration of a loop at a time, while parallel loops run up to five iterations of a loop at a time. This means that parallel loops are almost always the most efficient option, executing up to five times faster than serial loops. This is especially true when the loop is making calls to external services (via the HTTP Node, WEGnology API Node, etc.), since multiple iterations can execute concurrently while waiting for a response.
Here’s a diagram that visualizes the difference:
There are some cases in which it’s necessary to use a serial loop. If you need to mutate the original payload from one iteration to the next, or if you need the ability to prematurely end the loop, a serial loop might be your best option. However, we encourage you to adjust your workflow as needed to facilitate parallel loops where possible.
WEGnology API Node vs. Native Nodes
WEGnology is powered by a full REST API. The WEGnology API Node allows a workflow to utilize this API to access any resource under an application.
Many of the features available in the WEGnology API are also available as discrete native nodes. One example is the Device: Get request, which can be performed through the API or through the native Device: Get Node.
Since the WEGnology API Node has to make a full API request that leaves the private WEGnology infrastructure, this introduces an additional time cost. Therefore, native nodes will almost always outperform equivalent requests made through the WEGnology API Node.
In the example above, we’re utilizing a loop to fetch 1000 devices. The path at the top is using the WEGnology API Node in the loop, while the path at the bottom is using the native Device: Get Node in the loop. What a massive improvement; the native node is more than 10x faster!
Caching with Workflow Storage
You can cache responses from third-party services using Workflow Storage. If a value needs to be referenced multiple times across a workflow, this will help to reduce the number of API calls. It’s generally best practice to use Workflow Storage to cache API responses when relevant to your workflow.
Device: Get Node Queries
The Device: Get Node has a number of different query methods available. Smart usage of these options can result in improved workflow efficiency.
Device Count
If you only need to know the total device count of a given query, returning an object with device count metadata is more efficient than returning an array containing all matching devices.
First, select a query method that can return multiple results (all options other than Device ID). This reveals the Results Configuration section. Then, check Return multiple devices?:
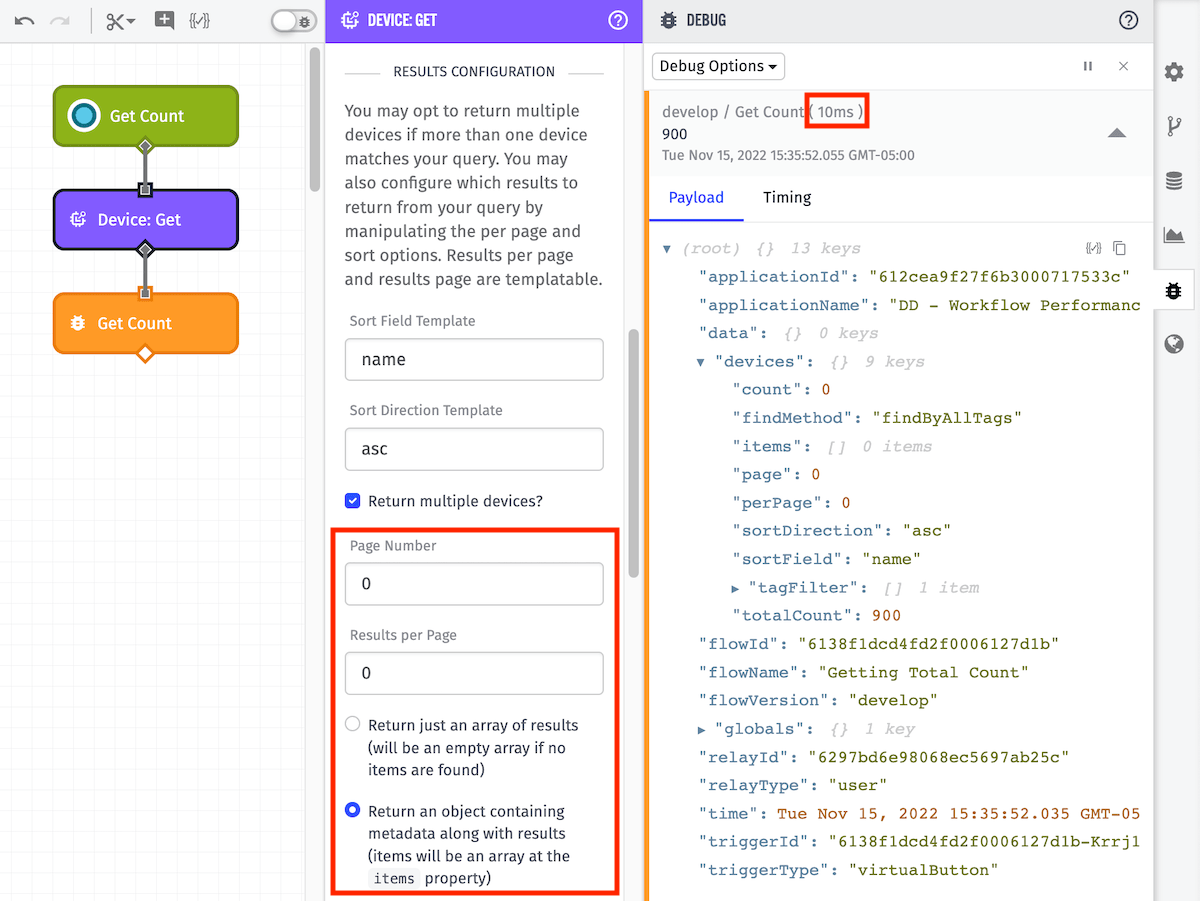
In the above configuration, we’ve set the Page Number and Results Per Page to 0, and selected Return an object containing metadata along with results. As we can see in the Debug tab (under devices), we have a totalCount value of 900. No other device details are returned. We can also see this request processed in 10ms.
Alternatively, if we were to request an array containing the details of all devices matching our query:
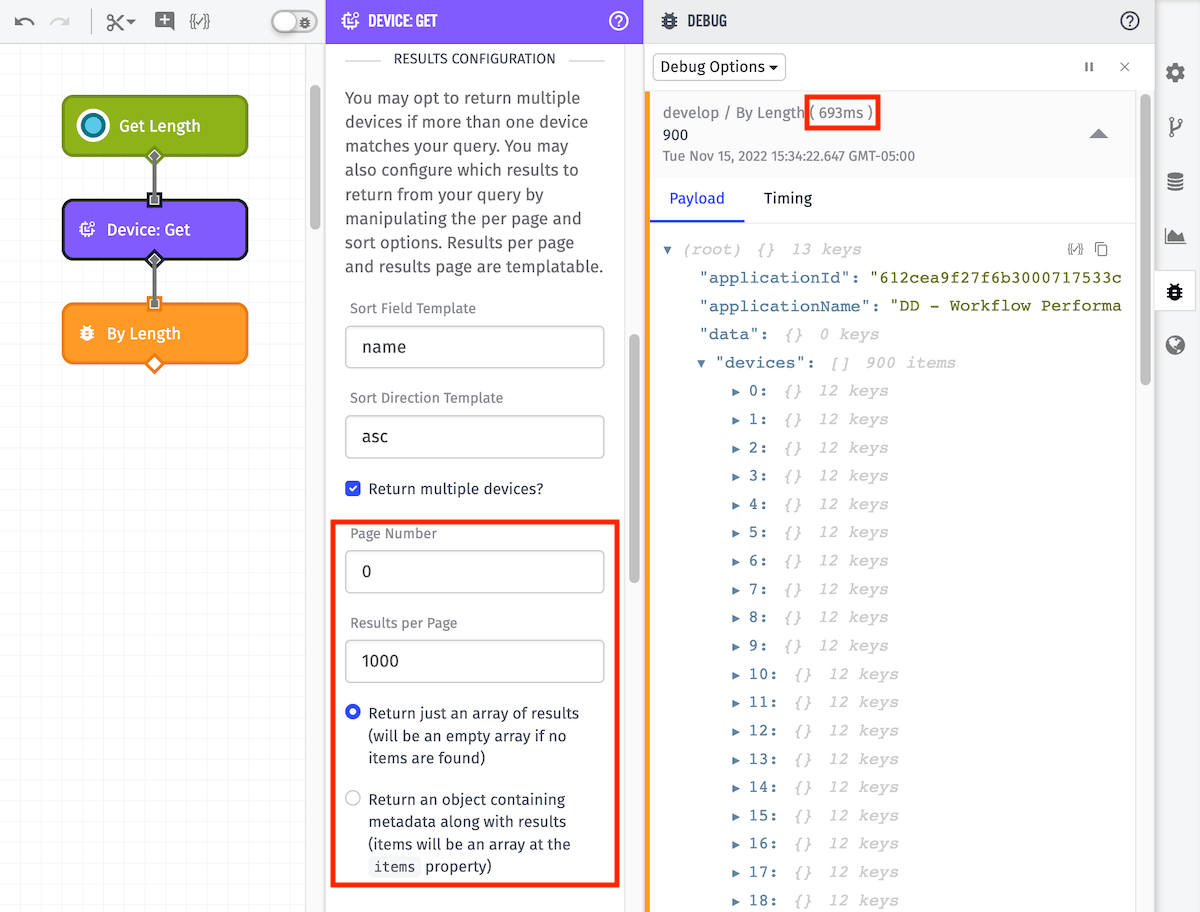
In this case, we’ve set the Page Number to 0, the Results Per Page to 1000, and selected Return just an array of results (will be an empty array if no items are found). Our Debug tab now shows an array containing 12 keys for each of the 900 matching devices. As expected, the processing time has also increased to 693ms.
Composite State
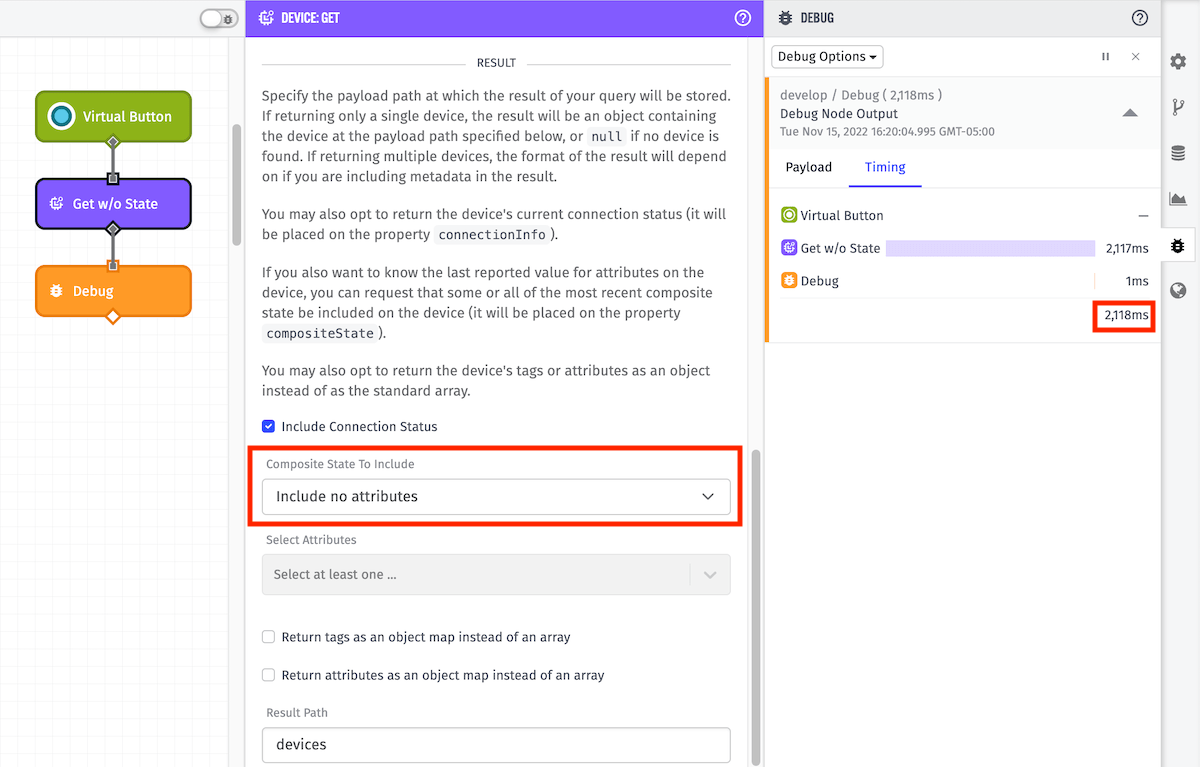
The Device: Get Node has an option to include the most recently reported device attributes in the result path. This is referred to as Composite State and is configured in the Result section. As we’ll demonstrate below, it’s more efficient to not include Composite State when it’s not needed.
The default option is Include no attributes, which will obviously not include any device attribute data:
If you want to return Composite State in your result path, you can select Include all attributes or Include the following attributes:
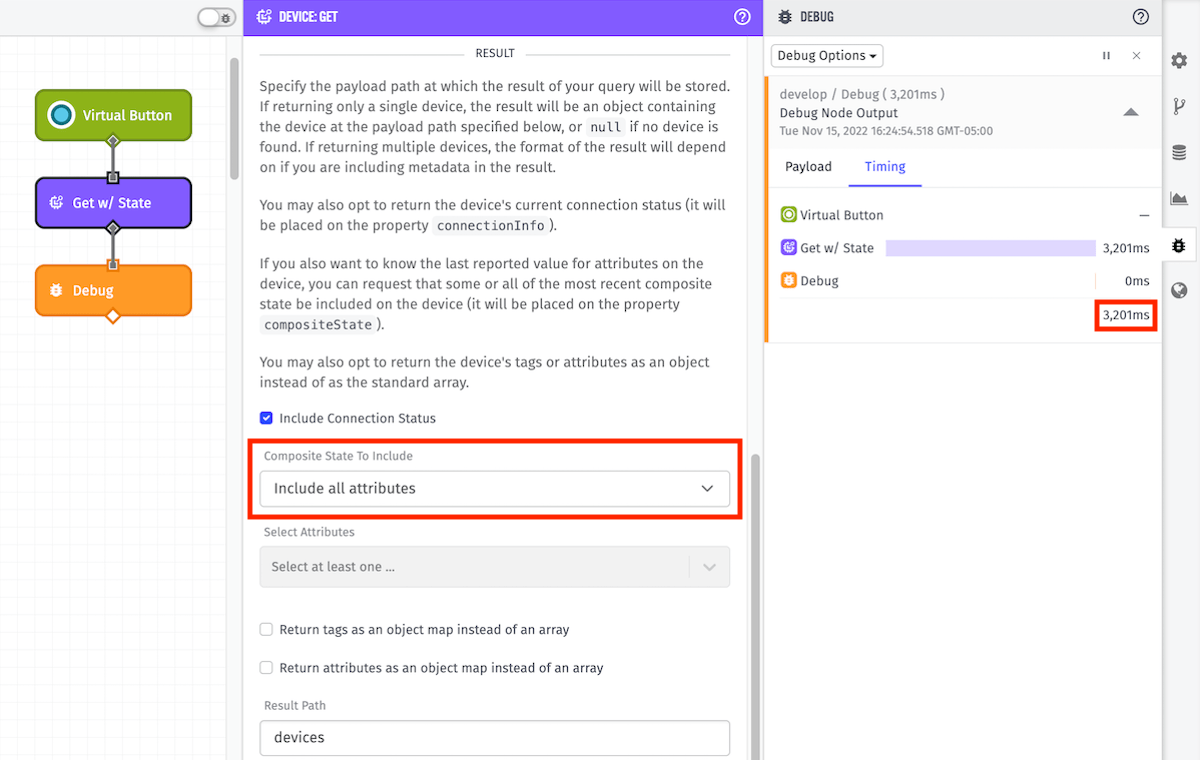
As we can see in our example, processing time increased from 2,118ms to 3,201ms when including Composite State.
Conclusion
WEGnology is constantly working to improve the usability and performance of our platform. We look forward to sharing these new features with you as they’re released. To wrap-up for now, a few key points:
- As mentioned in the introduction, utilize the workflow debug timing tab, Virtual Button Trigger, Debug Node, and workflow versioning!
- Consider scale when building out your workflows, and use the above tools to help simulate potential workloads. You can monitor workflow timeout errors using the Workflow Error Trigger.
- Visit our forums if you’re running into any issues or if you have any questions. There’s a good chance someone else had a similar question answered in the past!
Was this page helpful?
Still looking for help? You can also search the WEGnology Forums or submit your question there.
